Monday, September 28, 2015

I'm calling it a letter opener

This blade from Atlanta Cutlery resembles a miniature Luristan bronze, or others used in West Asia in the late Bronze and early Iron ages, so I went for a vaguely ancient Near Eastern look in furnishing it.  It could also pass for a Conan-esque fantasy weapon if it weren't so tiny.

In reality, I have no idea what they were going for with this design.  It most closely resembles a Sürmene knife, but the slop of the shoulders, undifferentiated pommel area and rounded butt end go against that.  In any case, I preferred something older.

The scales are maple; I sorted through the 1/4-inch planks at Lowe's to find the curliest piece available, although the rounded shape rendered the grain less visible.  With a light stain and linseed oil finish, it bears some resemblance to curly walnut.  I filed a small inset section into the scales and tang to hold the twisted copper wire, which begins and ends inserted into small channels in the undersides of the scales.

The pins are all 1/8-inch copper wire.  In most photos of the bare blade I've seen, the two holes at the shoulders look much smaller than the ones running down the middle of the tang - I bought some 1/16-inch wire in anticipation of that - but in fact they're the same size.

I could find little or no information about ancient scabbard construction, so I used a wood core covered with leftover scraps of light brown suede and painted on a generic winged beast motif.  I don't much like this bulging cross stitch and probably won't use it again; a flat cross stitch is much nicer-looking even if it does put more strain on the leather (at least the way I do it).

When worn, the thongs are passed over and behind the belt, down and out, then tied again in front of the scabbard below the first knot.  Alternately, the thong may be done away with and the scabbard simply tucked behind the belt, but I find this method uncomfortable, and didn't include a throat to prevent it sliding out of the belt (a la the "Elamite dagger").

The conceit in including a second sheath is that the blade was refurnished in modern times.  It's your basic veg-tan finished with brown shoe polish and acrylic varnish.  A snap is stitched to the belt tab and covered on the outside with a homemade brass spot before the tab is riveted to the sheath's back face.  Because the faces are stitched outside the welt for a tight side closure, the sheath looks much wider than one might assume necessary.  A back-seamed sheath would produce a narrower profile, but side-seamed ones appear to be more popular in America.

Friday, September 4, 2015

Iron Age Irish dagger

Pray, tell me the story of young Cú Chulainn,
How his eyes were dark, his expression sullen,
And how he'd fight, and always won,
And how they cried when he was fallen...
- Thin Lizzy

This is another set of fittings for my Atlanta Cutlery Arkansas toothpick blade, a wide but thin and handy blade that would be equally suited for a plug bayonet, a Medieval quillon dagger, or even a transitional antennae or anthropomorphic dagger from the Hallstatt and La Tène cultures.

In fact, the Irish short swords on which my interpretation is based were usually longer and less tapered (sometimes even flared toward the point), comparable to gladii in size and shape, and were basically short variations on the late La Tène long sword.  What inspired me to go this route is that the shape and proportions of the toothpick blade make it look like a miniature of one made by Shane Allee some years ago.  As a set of fittings made to be removable, this one features threaded construction secured with a ground-down steel hex nut.  (I'd have preferred brass, but as the set of dies I bought was defective, with a pair of 1/4-28s and no 1/4-20, I had to settle for whatever 1/4-28 nut was available.)

The pommel is pine and the guard is probably poplar.  The scabbard is two boards of basswood - soft and requiring little effort to cut, but splintery and loose-grained; I really wouldn't recommend it for fine carving like this.  The carvings are based, with some simplification, on a metal scabbard from Lisnacrogher.  The grip, somewhat shortened, is actually a leftover from an MRL rondel dagger currently hilted as my sharp akinakes for Persian reenactment.  I have no idea what wood it's made of, only that it seems like a good, dense hardwood, and it smells horrible when cut.  Aside from it, all the wood parts are stained with Minwax mahogany and finished with boiled linseed oil.

The throat is 0.015-inch brass sheet, held down with arrow glue and brass-headed tacks stuck through finishing washers.  The tacks are cut short so they don't protrude into the scabbard and scratch the blade.  The belt loop is somewhat heavier-gauge brass strip, soldered to the throat and tacked through the throat into the wood.

The chape is actually a large cotter pin.  I have no idea what a cotter pin is actually made for.  It's wrapped with soldered-on brass strip and held in place with the same aforementioned assemblage of washers and tacks (though down here they're well clear of the blade, so they're stuck through both the front and back scabbard pieces).

Monday, June 15, 2015

An etched brass medallion

This is what my mom requested for her birthday this year.  It's a circle of 16-gauge brass.  I scaled down and printed this design, stuck it on with a gluestick, then incised the lines lightly through the paper into the metal with an art knife.  After washing the paper and glue off, I used the incisions as guides for a permanent marker mask, sealed off the edges and back with wax, and dropped it into a ferric chloride bath for about 45 minutes.


On the back, the loop (a simple 1/16-inch rod) is secured with what I thought were very small beads of silver solder but which turned out to be more than enough once it was well melted.


I intended to give it a dark patina and brush back the raised knotwork, but none of my experiments with household chemicals worked.  Liver of sulfur would've been ideal if I could get any.  As it was, Mom said she preferred it with a bright burnished finish.  Unfortunately, the texture of the spray lacquer reduced the glossiness; it would probably have been better-off with a painted lacquer instead.

The medallion is worn on a simple brass chain with a silver lobster claw closure.

Sunday, June 7, 2015

Belt chain for my naval dirk

A more-or-less period method of wearing a two-ring scabbard.  The only original belt attachment I've seen on a dirk is on display over at Sailor in Saddle.  This is, obviously, a simplified and adapted version.

There don't appear to be any appropriate chains in hardware or craft stores around here, so I made this one from two feet of 3/32-inch brass rod.  Annealed and coiled around a 1/4-inch nail, it made just 20 links.  One of them, detached from the end and forming a side link to attach the tab (via its own ring) to the chain, is located nearer the top scabbard ring so as to allow the scabbard to hang at an angle.

The tab, of course, is just a scrap of veg-tan leather, molded, dyed, sealed and riveted in the back.

And there you have it.  I guess if I ever get zapped into a Horatio Hornblower novel and somehow land a commission instead of having to carry up buckets of bilge for a living, I'll at least have one thing taken care of.

Wednesday, May 27, 2015

Georgian naval dirk

This is actually a completely-refurnished dagger from a famous low-end Indian manufacturer (see if you can recognize it by the blade alone).  I still have all the original fittings, so it can pass for several time periods.

The Georgian period of British history lasted from 1714 until William IV's accession in 1830.  The concept of the naval dirk, issued to midshipmen as a badge of office (much like military dress swords of today), seems to have originated toward the end of the 18th century.  This dirk is an amalgam of several examples from the turn of the 19th century.

Many originals had grips of ivory.  In imitation of this, I started with a piece of light-colored wood, probably poplar, but the boiled linseed oil turned it orange, so that it looks, at best, like aged bone, and more like just...  well...  wood.  Still acceptable for the period!  It is quasi-turned by hand against the disc of a belt sander.

The grip turned out to be a little too short for the tang, so I made a quick pommel out of basswood.  This also adds a little better grip retention.

The pommel cap was a zinc-plated washer I'd originally assumed to be steel, until engraving it showed brass underneath.  At the other end of the grip is a simple sheet brass ferrule.

The guard was a challenge to make:  not only did its design have to be carved out with a Dremel and files, but before doing that I had to double up layers of thin bar stock and silver solder them together.  I tried clamping them, but the solder refused to flow between and just beaded on the seam.  What I wound up doing was spreading both surfaces with fresh flux, laying the solidified droplets onto one layer and stacking the other on top of it, then torching from the side until the solder melted and the top layer settled down - I was very lucky it sank straight down and neatly aligned before the solder froze; otherwise the whole thing would've been ruined.

Further damage to the illusion of a true high-class officer's weapon is done when inspecting the back.  The originals' suspension rings were mounted on small rounded studs that emerged from the side.  I don't know how these parts were made or attached; I think they were cast, and from photos they look to have been poked through holes in the sheet brass of the throat, but attempts to do this resulted in studs that wouldn't solder into place easily nor allow the throats to be fitted to the scabbard. Instead, here I have attached the rings to thin strips of brass like on a Roman gladius.

I should also have probably double-whipstitched the leather cover over the wooden scabbard core, but I didn't know how to do this at the time.  That would've let the seam lie flat so the throats didn't have to be open at the back.

The chape ends in a solid brass bead pinned into place with an escutcheon pin and again soldered on.  I initially designed the scabbard with the plan of matching the dagger to an epee du soldat from earlier in the century; that's why it's red and the chape is a slightly different design than one would expect for this type of dirk.  I've saved the earlier throat with integral locket for another project entirely.

Tuesday, May 26, 2015

Foundry, round V (and hopefully not last)

Our final project for foundry was a "mythology piece."  I pored over many potential subjects, including Greek gods and heroes in Mycenaean armor, and a wendigo.  In the end I went with a field I find surprisingly underrepresented - American mythology - and a figure even less well-known therein, John the Conqueror.

 The wax.  The statue (not including added base) measures 8-3/8 inches tall.

Quite a lot went wrong here and there.  I made his shins a little too short, giving the impression of him being all torso, and initially positioned his belt down too low; I had to shave it off and sculpt a new one higher up.  Also, his belt buckle is pointing the wrong way (i.e., toward the tip of the belt).

To make the statue stand on its own, I wax-welded his feet to a small pedestal.  When cast, considerable shrink holes opened up at the arches of his feet, the insides of the thighs and on top of the head where the main gate was.  Lab technician Ray TIG welded all the gaps closed.

Finishing this statue after it was cast sent me to the emergency room.  A flake of bronze bounced behind my face shield as I was grinding off the sprues and stuck in my eye.  Luckily this type of injury heals easily, but in this manner I lost the whole day and failed to finish the statue satisfactorily by the end of the semester.

Since the main gate attached to the top of his head, I made his coif smooth and textured it with many tiny grinds from a Dremel cutting wheel after getting rid of the stumps.  Admittedly, these grinds do give the impression of a straight-haired crew cut rather than the desired curly effect.

The statue is finished with liver of sulfur on the skin and hair, bismuth sulfate and titanium dioxide on the shirt and ferric nitrate on the pedestal.  Unfortunately, the titanium dioxide doesn't stick well.  I rubbed most of it off, then waxed; the remaining powder quickly mixed in with the wax and ran onto other areas of the statue.  I will have to remove it and redo it at a later date.

I handmade his broken chain from some heavy-gauge steel wire I had lying around the house.  It's a simple butted construction, and lies loose in his curled hand (I would bend the fingers to grip it, but not until after getting the statue's finish right).  I'm pretty sure this method actually turned out better than making a wax chain cast in place would've been.

Wednesday, May 13, 2015

Foundry, round IV

 
Much of the smooth finish and finer detail of my original clay was lost between the plaster mold, wax positive and sand mold.

Also, the upper right corner of the frame cast in a separate piece from the rest of it and had to be TIG welded.  I tried doing a little TIG welding myself at the suggestion of Jon Burns since I'm looking into getting a job in the foundry industry, but it's pretty tricky and my attempts failed.  Anyway, glowing-hot liquid metal is one thing, but when I can barely see what I'm doing while inches away from being electrocuted is when I get reluctant to continue.

The dragon itself is colored with ferric nitrate and the field with a heavy layer of liver of sulfur, which began to flake.  The liver was strangely greenish when first applied.  I had to brush back the two patinas several times with a Dremel wire brush to clean up where they splattered onto each other.

Unfortunately, the brilliant colors darkened and faded with the final wax.  I also had to remelt the wax and rub off the excess when it began flaking the next day.  Still turned out tolerably well, I'd say.

Sunday, March 15, 2015

Foundry, round III

It's done!

Layered liver of sulfur and ferric nitrate patinas with a shoe wax finish.  It still smells like smoke.  I think it could've done without the ferric, which isn't highly evident on the finished piece, but I said I would try both, so I did.  You can see some in the deeper recess such as around the neck.

My first attempt at a clay positive for a sand-cast bas relief.  Obviously it'll require some re-moistening and building up so it won't fall apart (the plaster mold is actually supposed to be made while the clay is still slightly damp).

On another note, the first coat of ceramic on my chape came out slightly bubbled and crazed despite my best efforts.  On the first two coats, I tried to blow ceramic into every tiny crevice until I was dizzy.  The next bronze pour isn't for another three weeks, so I can take my time on the remainder.  I may make a silicon mold after cleaning up the casting, though it's a long shot if that'd be any use to anyone.

Monday, March 9, 2015

Foundry, round II

The Laughing Buddha of Newtown survived the casting process intact, but with a number of little warts caused by bubbles in the initial ceramic coat.  I'll have to remember to wear some well-fitting rubber gloves and pop every single bubble when I get around to my slurrying my akinakes chape, which is similarly  detailed.

I didn't take any photos of the gating or slurrying process, because 1)  it would've been difficult in the middle of class, especially in the very messy and crowded slurry room, and 2)  you can find plenty of photos of those processes, and they weren't unique in any way for my project.

For the past nine days, I've been grinding and cutting away the stubs and filing down the bubbles as well as various small ripples caused by the inevitable imperfection of the wax positive.

Next up is grinding off the last stump of the gate, and then applying the patina.

Monday, February 16, 2015

3-D Modeling Concepts, round II

Continuing in a purely straightforward manner, last week's assignment was to create a disembodied human hand.

It's modeled on my own hand, thus the weirdly-angled first and last metacarpals, and drab coloration.  The only real mistake is the last knuckle; I put the pinkie at too steep an angle, and several steps along the way, the knuckle came out looking more like a wrinkle than a dome shape.

Gotta level with you:  I strongly dislike CGI, and the more I do it, the more I dislike it.  I've rarely seen any piece of CGI that I didn't think would've looked immensely better if it were hand-drawn.  Especially animation.  I don't like computer animation any better now than I did when Toy Story came out.  I am dreading the part of this course that covers it.

On another note, I'm pretty sure nobody at Bucks reads my blog - actually, hit counts indicate I get about one view per post - which is only good insofar as I can get away with badmouthing a class I'm currently taking.

Friday, February 13, 2015

Foundry, round I

Here's the wax positive for my first assignment in Foundry, creating a talisman.  I worked from a little souvenir shop statue my parents have had for many years of the Laughing Buddha, whose astounding belly brings good luck to all.

I'm an American, and 13 years after reading Siddhartha in high school, the image that comes to my mind when I think of a "Buddha" is still the Chinese figure of Budai or Hotei.  Depending on who you ask, Budai may be a Buddha - a previous incarnation of the future Maitreya Buddha - but in no case is he claimed to be the Buddha, i.e. Siddhartha Gautama, the Buddha who founded Buddhism.  Nonetheless "Buddha" sounds like a rather round and jolly word to an English-speaker and that may be one reason the image is so persistent.

He's still not finished; the feet and left hand all need digits carved and I haven't attached his ears yet, plus the model should be hollowed out as much as reasonably possible.  However, the Sun was going down and the was may well be covered in slurry by tomorrow, so I figured it was now or never.

The one thing I'm not satisfied with is his face, which looks less jolly than the original, and more like a fat cave troll laughing at your doom.  Well, I did my best.

Monday, February 9, 2015

3-D Modeling Concepts, round I

For spring I'm taking two courses at Bucks again, 3-D Modeling Concepts and Foundry, since Professor Mathews of the 3D Arts department told me that many foundries are making use of digital prototyping.  I haven't produced anything for Foundry yet although I have my first wax in progress.  The first three assignments for Design were a "temple," a sledgehammer and a crowbar.

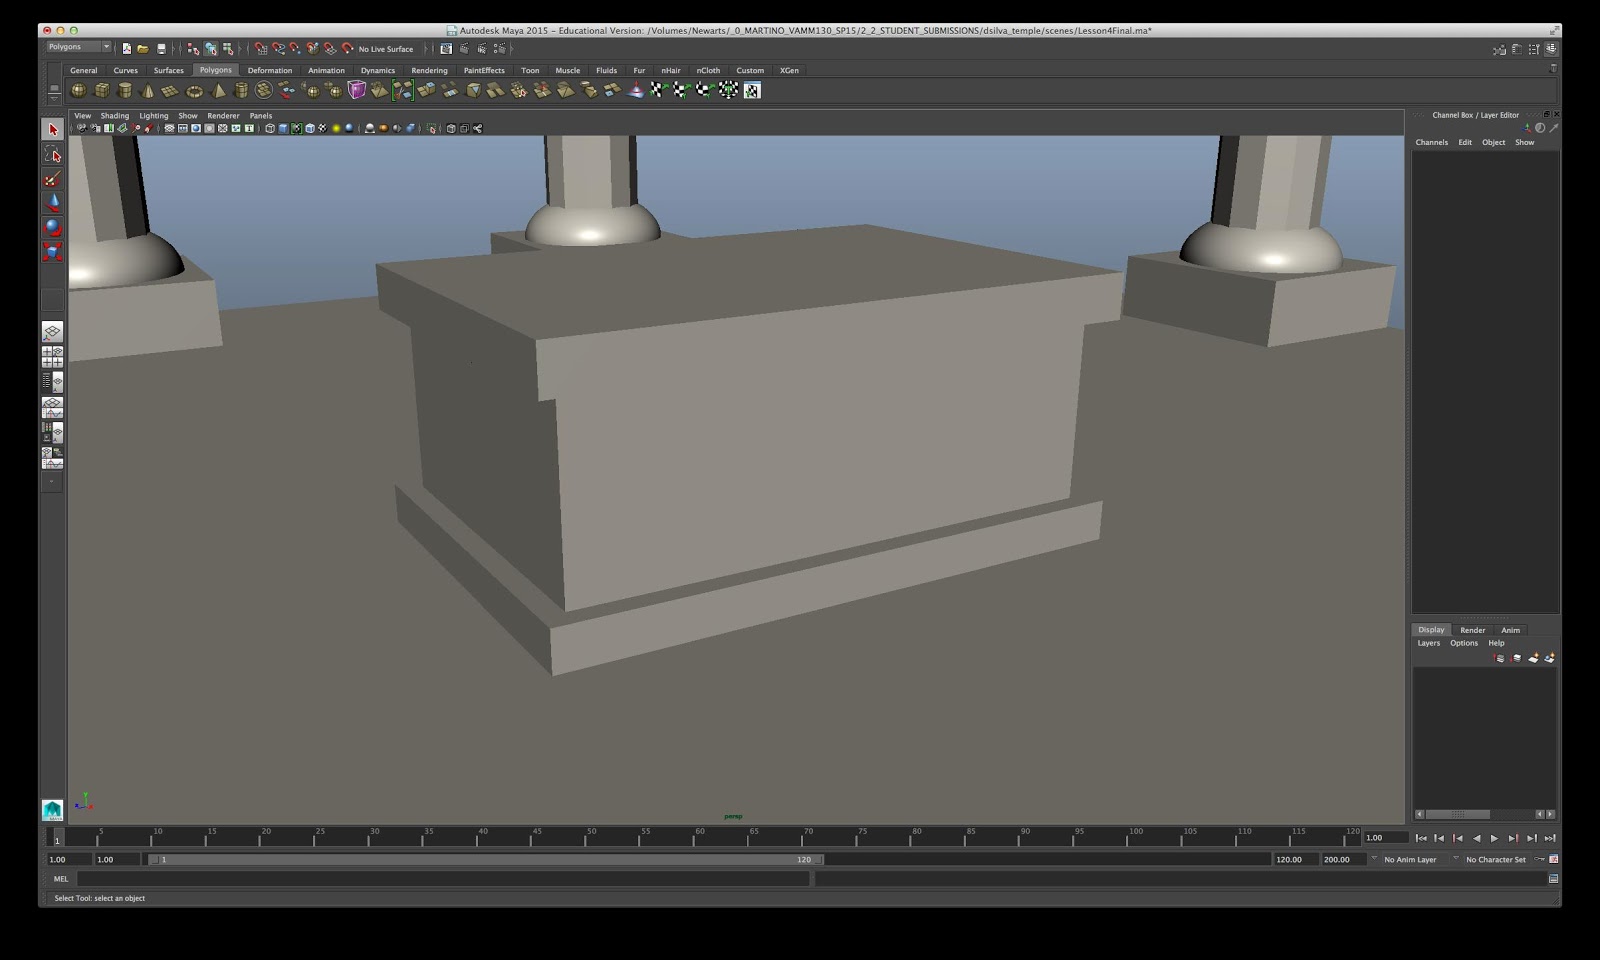
Slight customizations:  The multiple tones and finishes are a departure from the overall "blinn" finish and "sand" color the instructional calls for.  The spire and altar are also both mine.  These are nothing once you get the basic processes down.  The server indicates that a classmate of mine named McCall created a very elaborate piece of architecture for his or her final.

Closeup of the altar.

For the sledgehammer, I went with a lighter tan for the handle, as I'm accustomed to seeing in modern hardware stores, likewise the polished steel faces.  No physical customization.

The crowbar, or prybar as the instructional calls it.  No customization.  It was tricky enough to get right in the first place.

Something went wrong with the curved tip.  Both the "front" and "back" faces should extend to the edge; instead, the "front" face above (relative to us) sinks in and actually protrudes a tiny bit in wireframe view.  I'm not sure how to correct it yet..