Monday, April 15, 2024

Boot Bowie from commercial patch knife

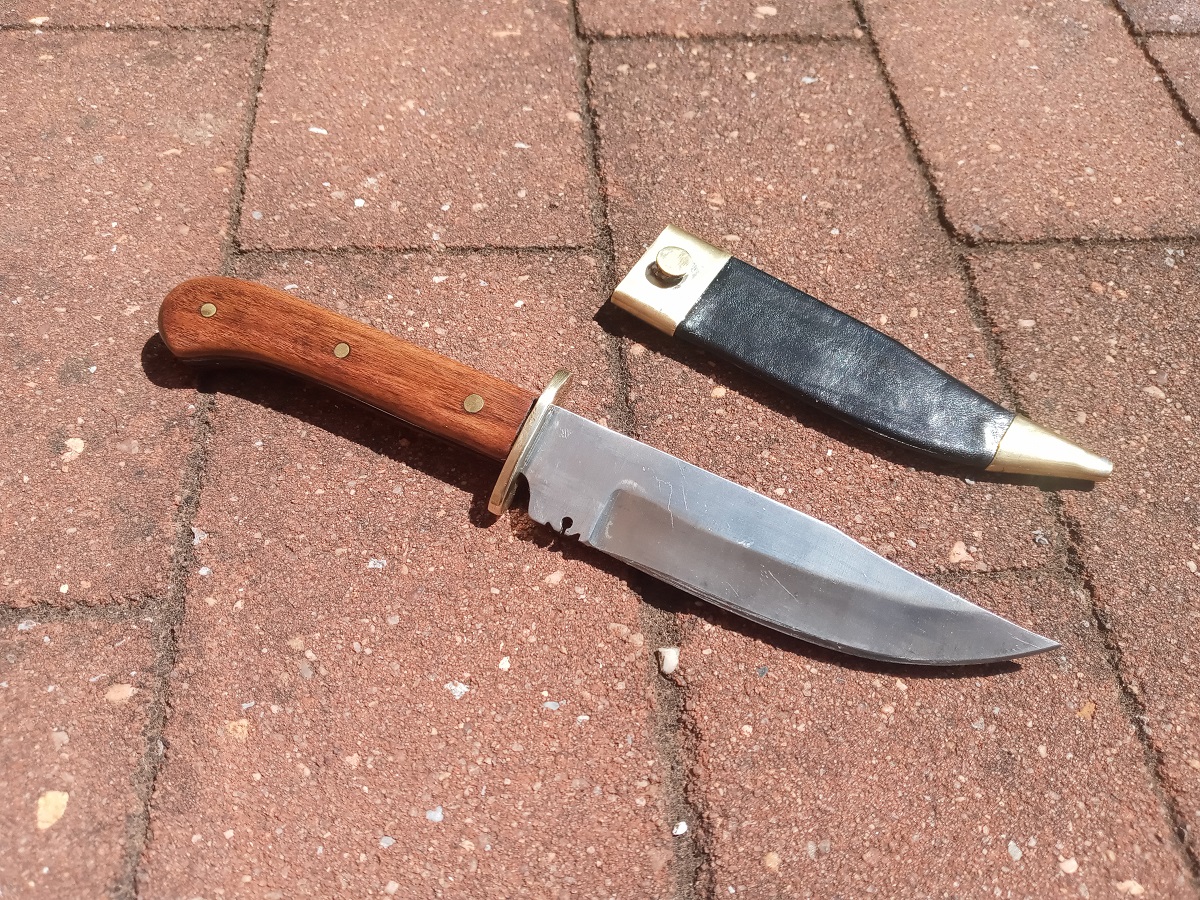
A couple years ago I bought a cheap "large patch knife," made in Pakistan.  While I'm not aware of any historical knives that it resembles, some of its features make it look like a 19th-century Bowie knife.  It really lacked only a guard and a more appropriate scabbard.  So last year I set about turning it into one, and I've just gotten around to finishing the job in the last few days.

It may seem at first glance more sensible to start with a bare blade of the same pattern; however, I have reason to believe that these blades when sold unfinished are not always hardened, whereas the knife I bought was well-reviewed, with no complaints about its edge retention.  That and some shopping around indicated that I could get a finished knife cheaper.

What I feel was a mistake was not saving the scales, which were some kind of probably tropical hardwood and, I suspect, tougher than the wood I replaced them with.  Keeping them would've made refinishing much faster.  They weren't glued on; actually I don't think there was anything really holding them in place except the pins, which were ground down to make the fit flush.  Unfortunately I wrecked them in the process of prying them off.

19th-century Bowies with straight backs and upswept edges seem to be very rare, so the first modification I made after removing the scales was to grind on a clip point.

The finger guard is an inexpensive sand casting from Crazy Crow.  The first step was filing out its slot so that it would fit over the pommel swell of the tang.  I next had to figure out a way of fixing the guard.  A scale-tang knife can have a fixed guard pinned between the shoulders and scales, but this one had only one shoulder, which was sloped, and the tang was wider at the butt end, so even if the guard couldn't slide up and down, it would be able to slide side-to-side.

Killgar at BladeForums suggested a solution:  pinning some pieces of brass bar in place and soldering the guard to them.  I didn't entirely understand the idea, and wound up making the guard's slot wider to fit over the brass strips, which makes it a bit uglier to look at.

The scales are cherry, also from Crazy Crow, with inlets sanded in so they fit over the brass strips.  Another way of doing this that is only just occurring to me would have been to make the brass in the form of full-profile liners, which would obviate the need for inletting the wood scales.

The cherry wasn't as dark as I'd have liked, so I stained it with Minwax mahogany mixed with just a bit of Minwax ebony.  I then applied boiled linseed oil and finished with Tru-Oil.  Pinning the scales left them dented and dingy, so I sanded most of the damage out, re-stained and re-finished.

The scabbard is lightweight veg-tan.  Sheffield scabbards seem to have normally been black or red.  Since I have no red leather dye left and I've never been able to satisfactorily neutralize vinegaroon, I used Fiebings pro black, sealed with Resolene and gave it a light oiling by filling it up with olive oil and immediately pouring out the excess.  The fittings are brass, fitted in the usual way, with a fabricated and soldered frog button and a stapled throat (stapling was tricky this time because the sheath fits very tightly around the blade's ricasso).

Here it is next to a non-modified example.  The grip as I made it has a very slight overhang around much of the tang.  The non-modified one must have been flush when it was made, but at the moment the scales seem to have shrunken, most likely due to changes in humidity, and some of the sharp edge of the tang is exposed.  In this way the new grip is more comfortable.


Less fortunately, the added guard leaves less room to grip.  It just barely fits in my hand (glove size medium); for anyone with larger hands it just wouldn't work.

While the frog button allows the scabbard to be worn on the belt, the small size makes it just as appropriate as a boot knife or even in a large overcoat pocket.  However, due to the tight fit in the ricasso area, it's not currently possible to push the scabbard off with the thumb the way I normally would prefer to do when drawing such a knife from a coat pocket.  The solution I'm currently attempting is to dampen the sheath and shove a smoothed 1 x 1/8-inch brass bar into the top to stretch the leather.

Saturday, July 22, 2023

Archery set

For Mom's birthday this year I'd long planned to make a belt and quiver to go with the bow I bought her two years ago.  The Seven Meadows child bow is a scaled-down version of their Scythian style, with no siyahs, but Mom asked for the equipment to be something she could wear to Renaissance fairs.  Because she's half-Bohemian, I decided to try to model it after that which was used by Bohemian archers.

Unfortunately, at least in the English-speaking world, information on something as specific as Renaissance-era Bohemian archery equipment is very difficult to come by.  What little I was able to find seemed to indicate that their stuff resembled Eastern European and Turkic gear, so in the end I modeled it after Ottoman Turkish examples, with the modification of using Western European belt parts (a D-shaped buckle attached by a plate and a chape).

This was the first time I'd stitched fabric over leather.  I cut the fabric slightly larger than the bowcase and quiver, cut the edges of the fabric into tabs, folded the tabs under, glued them with Fabri-Tac and then stitched them with linen cord.  The result is very rough-looking.  I will have to put further study into how this should have been done historically.  One thing I've already noticed is that the originals appear to have had fabric with designs woven or embroidered for the case and quiver instead of taking fabric that was woven by the yard with designs already added and cutting it to shape, as I did here.

This was also the first time I beveled and burnished the belt edges and pasted the back.  Burnishing tutorials often recommend using a combination of gum tragacanth, glycerin and/or saddle soap, beeswax, etc.  To keep things simple, I used TandyPro Burnishing Solution, which is intended to be all-in-one, but I unfortunately found that it dries very stiff.

The chape is by Lord of Battles, but since we settled on a wider belt than a matching buckle is available for, I used a 1-1/2" heel bar buckle from Buckleguy and made a matching plate from a wide brass strip, etched with ferric chloride.  In order to allow the belt to be worn with the case or quiver, they have attached buckles and straps which go through slots cut in the belt.  The buckles are the same type as the belt buckle, in a smaller size.  The two knotted leather bands used to stabilize the quiver will eventually be trimmed down; they can even be removed entirely.

The conchos are also by Lord of Battles.  They're very thin and have to be attached with 1/8-inch rivets.  To try to keep them from collapsing, I put several brass washers under each one.  I then trimmed the rivets to the most exact length I could, and peened them over washers, hammering the peen from all angles to give it a smooth dome and minimize chafing on clothing.  To keep the domed rivet heads from being flattened, I set them in a small round pit drilled into a 1/4-inch steel bar.  This unfortunately meant that in the process of rounding the peens, the conchos came into contact with the bar, and some of them are a bit flattened in places as a result.  The final step will be to make some field arrows (she has declined any offer of blunt SCA-style combat arrows).

Monday, June 19, 2023

German hunting trousse, part X

The cleaver came together much like the accessories:  scales oiled and varnished, allowed to cure in the sun, then glued and set with mild steel pins.  No process pics this time, it was too messy.

I accidentally left the scales out overnight in what I thought was an aluminum tray.  It turns out it was non-stainless steel.  Dew collected under the scales in the morning, causing the scales to swell, the oak tannin to react with the steel and create black stains on the undersides of the scales, and the surface of the tray to rust.  Also an animal pooped in the tray, though thankfully nowhere near the scales.  The warping resided after a few days indoors.

I had earlier found that when the accessories, whose scales were attached with pitch glue, were allowed to get too hot, the glue softened and exuded out of the seams.  I attached the cleaver's scales with epoxy and set the pins while it was still liquid.  This was not a good idea, as the epoxy got onto the scales and was very difficult to wipe off.  The finish is therefore duller than it should be.  In this regard, it may have been better to use pitch glue, which would cool and harden rapidly.

The hilt is not comfortable to hold thanks to the protruding washers, but perhaps this would make for a more secure grip, or historical washers may not have been as highly domed as the ones I used.  The pins required many little taps with a light ball peen hammer to tamp down the edges of the peens and prevent them from scratching the palm of my hand.

This project is far from over.  It will require a specialized scabbard with side pockets for the accessories and custom steel mountings, and possibly a belt, before it can be considered complete.

Sunday, January 15, 2023

"Spare parts" hunting sword

A mid-18th-century hunting sword built around a Medieval Fightclub mini sabre blade.  The blade and the ground-down M8 hex nut are the only parts I bought for this project; everything else is either spare material or bought for other projects and left behind when the specs changed.

As such, the fuller has a round start where it should be square.  Also the hardware is a bit less ornate than would be normal on this type of sword.  The belt buckle is from Bucklecastings.  The crossguard is a Crazy Crow Bowie guard, hammered into a slight S-curve and with a pair of cold-forged volute finials silver-soldered on.  The finials and all other brass hardware (except for the escutcheon pin added to prevent the pommel plate from rotating) are fabricated from various pieces of sheet and bar stock from Ace, with most detailing hand-filed.  The difference between the Crazy Crow and Ace brasses are noticeable where the finials are attached to the quillon block because Crazy Crow's brass is more reddish.  It's also softer yet more prone to cracking when cold-forged, even after annealing.  I'm very lucky this guard didn't, but another one I tried to use for this project did when I attempted to "unroll" it a little.  If it weren't for the prospect of cracking, I would have re-flattened the current guard, since I am finding that the finial bumps annoyingly against my index finger if I hold the grip wrong, which is why I tried to straighten the one that broke.  The hilt is assembled with pitch glue.

All leather is veg-tan, stitched with linen cord and finished with homemade walnut hull dye, olive oil and beeswax.  I did only two applications of dye.  The second time, I stirred up the sediment from the bottom of the jar and painted it on evenly to produce a very dark brown, let it dry, re-moistened it with a wet brush and wiped it all off, leaving the leather a pecan shell color which is darker than its natural state, but not as much as the initial dye applications seem to promise.  The oil and wax darken the leather further and bring out its natural orange color, which combines with the walnut dye to produce this orange-brown (without the walnut, the natural result would be what's commonly known as saddle tan).  By the way, I think the near 17-inch length is about the most that a single-layer scabbard of unhardened leather can be and still be useable.  It's already more flexible than I'd like; any longer and it would need a wooden core or for the leather to be baked or otherwise stiffened.

The grip is American walnut with linseed oil and oil-rosin varnish.  I designed it to match my belt knife from 2017, and originally I planned to give the sword a wooden scabbard core with a sheath for the knife.  However, I made a mistake when I tried to put the core halves together with pitch glue to make it water-resistant.  It turns out that while pitch glue is good for joining leather to wood, it's not so good for joining wood to wood — which makes sense, otherwise it would've been more commonly used for that historically.  The seams kept cracking even with light handling and finally broke apart completely when it fell off a desk, and with its edges saturated in pitch, I couldn't just reassemble it with hide glue, nor did I have the patience to make a new one.  This isn't entirely a bad outcome.  As is, the vertical carriage makes the hilt stick up uncomfortably close to my ribcage (I'll probably just use angled frogs from now on).  Adding a side pocket for the knife would have required the locket to be even lower on the scabbard so that the knife could clear the frog, in turn requiring the hilt to be even higher relative to the frog and belt unless I wanted the frog to hang down even lower than it does, which would make drawing awkward — it already almost requires one hand to hold the frog down when drawing.  I plan to eventually make a separate sheath for the knife that can just be tied to the belt, as the original is finished with modern dye and acrylic, and doesn't match the new leather in appearance.

The locket is soldered to the throat instead of being stapled directly to the scabbard.  The chape is a rolled cone closed at the tip with a soldered 1/4-inch brass tack.  Both the throat and chape are epoxied — I would normally want to staple the throat and use pitch glue, but in this case the scabbard fit the blade so tight when the throat was in place that there wasn't room to spare inside the scabbard for the method of stapling I've been using on other projects.  So I used epoxy to hold the hardware on as best as possible.  If I had known ahead of time that I was going to wind up with a single-layer leather scabbard, it would've made sense back when I made the locket to attach a staple to it, obviating the need for a throat and leaving the scabbard loose enough for the staple as well as allowing me to dispense with the only modern material this sword uses.

I had to remove a lot of the 1mm edge to get this blade cutting sharp, and it's still not a great cutter.  It can chop into an old Halloween pumpkin, but just bounces off water-filled plastic bottles.  Someone more skilled than me could probably make it sharper; however, the steep primary bevel resulting from the relatively thick, narrow blade would place a limit on how sharp it can be, unless you reprofiled it with a shallower grind.  Also, the entire sword is less than two feet and weighs under one pound, so there's not much momentum or leverage behind blows.  I can see this in the role of an informal town sword with some defensive use, which was common for the little hunting swords of this period.  As such, this is probably a good representation of Resenter I.

Monday, January 2, 2023

German hunting trousse, part IX

I next returned to working on the cleaver.  I've been putting it off for a long time because of technical challenges that I was unsure of how to deal with.

Firstly, a method of how to fabricate the side ring rivet and affix it in such a way that it wouldn't rotate in the rivet hole had long eluded me.  Many of the originals have spike-shaped extensions sticking up from the rings along the bolsters which I surmise were created by sophisticated forging techniques and incorporate extra pins.  Fat chance of me accomplishing anything like that.  However, not all of them are constructed this way, and I eventually came across a post on myArmoury by Lukas Mästle-Goer which shows an alternative method:  The side guard - in his case a shell Nagel for a Rugger, but it would work just as well with a Waidpraxe's ring - has a rectangular base that fits into a slot on the face of the bolster, locking it in position.

With this understanding, I drilled a 5/8-inch hole in a bar of mild steel, cut out the ring around it with an angle grinder, and ground and filed its shank down to a round cross section 3/16 inch thick.

The other problem was no more complicated but will take longer to explain:  Most hunting cleavers of the 17th century have a finger guard on the edge side of the blade that protrudes out past the blade shoulder.  This seems to have been created in one of two ways:  Either the bolsters are forged as a single piece that semi-encloses the tang, with the two bolsters held together by the finger guard itself, or they're made in two pieces and the tang also features a protrusion that they're sandwiched on either side of.

Because I can't weld and the Crazy Crow blade has no such extension, my first attempt to deal with the problem was to create a pair of bolsters with protruding finger guards, soldered together by a small piece of filler steel.  However, this proved unfeasible.  The filler piece was a hair too thin and the tang wouldn't fit into the guard.  I tried grinding out the inside, but the solder wasn't strong enough to stand up to the vibrations and the guard fell apart.  After re-soldering and re-grinding several times and getting nowhere, I put the whole thing on hold.

Again, myArmoury came to the rescue.  At a later date, I found a post by Radovan Geist of a knife that looked a lot like the one I'm working on, although it is intended as a Bauerwehr (thus again a solid shell Nagel instead of a ring).  It even had a little un-beveled section of blade shoulder just like the Crazy Crow blade's ricasso, which Radovan used as the support for the bolsters.  Looking through my collection of hunting cleaver photos, I realized that a handful looked quite similar with small finger guards that didn't protrude past the edge of the blade.  This was the solution.  (I also copied his idea of adding a thinner pin hole to the blade shoulder so that the bolsters could be pinned there as well.)

Starting fresh, I cut two new pieces of mild steel in approximately the shape required.  Another problem soon arose:  The part of the blade that transitions from the tang to the ricasso becomes thinner, and while the transition is more-or-less flat on one face, it's curved on the other.  This meant that while one bolster could just sit as it was and be pretty much flush with the blade, the other needed to be ground on the inside to match the curve; otherwise, it would teeter across the tang's surface, leaving a large gap on one edge or another.

 
The bolster partly through shaping.  I managed to get it not quite so bad after a few more passes of the angle grinder's flap disc, but perfection eludes me.  In this project I won't feel so bad about using a modern epoxy to fill the gaps..

Once that was done, getting the profile perfect was simply a matter of glueing, drilling, and grinding the edges flush with the tang.

After that, the bolsters could be detached and rough-shaped.  Adding the slot for the ring was another tricky step:  Unwilling to risk mayhem with the aggressive angle grinder, I instead used my Dremel with a fairly small flat stone grinding disc.  This took longer but I believe reduced the chance of the slot coming out crooked.  I finished it with coarse files.

Next I added some decorative grooves freehand with needle files, then polished everything up.  Finally, it was time to peen the pins and rivet.

I epoxied first, then set the smaller pins - a cut section of 1/8-inch common nail as used throughout this project, and an annealed section of thinner finishing nail in the shoulder area.  Then I ground and polished out the dings.

 
I set the ring rivet last, after annealing, re-polishing, and shortening the shank.  To prevent the ring from being marred, I put the 5/8-inch drill bit through it and had it rest on two steel blocks with the ring between them.  The bit supported the ring and prevented it from popping out as the shank was peened.  Then I once again ground and polished the peen to be less protrusive and visible.
 
The cleaver with rough-cut oak scales and washers.  I'll be getting them closer to their finished shape and might start the scabbard over the next few months, but this is the last update I'll be sharing on the cleaver until spring, when the weather warms up enough to varnish the scales.

Thursday, September 22, 2022

German hunting trousse, part VIII

The knife is a traditional Jagnicker blade of a type that originated in the 19th century.  It strongly resembles earlier forms, but has noticeable differences.

Using my trusty angle grinder, I reduced the size of the bird's-head, flattened the grip belly, and ground away as much of the finger guard as I felt comfortable removing.  The slight bolster left behind is still not historically accurate, but I've resolved to live with it.  I then applied the scales, pins and washers as with the fork.

I haven't thrown away the old belduque blade; in fact, I already have a project in mind for it.

The set so far.  You'll notice the sanded-down edges of the scales are much paler; this should be resolved when I get to varnishing.

Tuesday, September 20, 2022

German hunting trousse, part VII

Remember seventeen months ago when I said that this project is going in a somewhat different direction?  Now that the interminable preparations for Plataea 2022 are behind me, I can show you what I meant by that.

I'd never been satisfied with the original start of the project, using ash that had been textured and stained to resemble antler and then glazed with a modern wood finish.  The homemade nickel silver washers always turned out uneven and didn't look like historical examples.  They were also difficult to drill and the pins were difficult to peen, which didn't bode well for the idea of making nickel silver fittings for the cleaver.

Wanting to use more historical materials but still not wanting to rely on genuine antler, I've decided to just make the scales out of a good honest wood that isn't pretending to be something it's not but still has a rustic look in the same vein as antler.  I selected white oak, which is the preferred oak for cutlery, being much less porous than the red oak commonly sold in the States and (so I read) more similar to European oak.  For this purpose I ordered 1/4-inch scales for the cleaver and 1/8-inch scales for the accessory pieces.  I'm finishing them with linseed oil and historical rosin varnish.  These give the wood a richer, more yellowish color than it originally had.

Henceforth, all fittings except for the washers are going to be steel instead of nickel, with pins cut from 1/8-inch common nails.  The accessory pieces have forged bolsters while the cleaver will have a guard and nagel cut from 1/4-inch mild steel.

For the washers I gave Radovan Geist's method of using upholstery tack heads another try.  This time I drove the tacks into a block of wood, used my Dremel round cutter to grind a pit in the exact middle of the tack to prevent the drill from slipping off-center, and proceeded with the drill press.  I then removed the tacks, pried out the loosened shanks, and gripped the tack head's edges with a pair of pliers as I finished drilling out the hole.  The tack heads often seized on the drill bit, causing them to spin around in the pliers and be badly scratched on the sides, and the drill bit often wandered off-center despite my best efforts, but thankfully upholstery tacks are cheap and I could give it plenty of tries until I got enough washers for the project.  Even the edges of the washers that didn't get unuseably scratched often required a little cleanup with a finetoothed needle file.  Finally, I've used the large attachment of a line snap setter to roll up the sharp edges of metal that stick downward inside the washers.  It's a lot of work, but the result is a much, much more professional washer than I could have fabricated from metal stock.

After the varnish had cured on the first set of scales, I attached them with pitch glue, drilled, used an X-Acto to trim the scale edges flush with the fork's tang, sanded the scales round again, and just this afternoon I set the pins.  There is a stainless steel washer under each domed washer to try to reinforce it from collapsing during the peening process.  I don't know if this helped but they don't seem to have been flattened.

I sanded out some of the dings that resulted from peening, and have reapplied linseed oil and will be re-varnishing the scales over the next week or two.  The knife should go pretty much the same way.