Friday, October 29, 2021

Things That Aren't Here Anymore, part V

In a moment of prescience, I photographed the old houses on Durham Road nine years ago.  Not long afterward, they were demolished to make room for an assisted living facility called The Birches.


Saturday, July 17, 2021

Garter or gambler dagger

I built this one around a German blade of unknown manufacturer or metal content which I obtained last year.  It came with a hard black coating which I've tried to sand off, although there seem to be tiny crevices in the metal that made removing all of it impossible.  I bought the guard from Crazy Crow some years ago; they seem (then and now) to use a faintly reddish brass, which is why it doesn't quite match the other fittings.  The style of small sand-cast guards they sell has changed, becoming much more rounded at the ends.

The grip is American walnut, turned to shape - the first time I have ever created a lathed handle - flattened slightly at the butt end, and with hand-filed ridges above the ferrule.  It's finished with Tried & True Varnish Oil, an old-fashioned varnish made of a mix of rosin and linseed oil such as was used in previous centuries.  I followed directions from The Muzzleloading Forum member Stophel and finished the wood with shellac, adding extra rosin dissolved in turpentine to the varnish to make the final product harder.  The varnish has to be cured outdoors in sunny weather and turned repeatedly to ensure that all sides are exposed to the sun.

The scabbard is 4-5oz. veg-tan, stitched with linen thread and dyed with several applications of cochineal steeped in alcohol.  I finished it with neatsfoot oil and then a beeswax-linseed oil blend, thoroughly buffing off excess color in between.  The fittings are all brass.  At the top is a ground-down hex nut; under it is a washer to hide the width of the tang hole (the tang is not tapered except at the threaded end) and the marks from the lathe's plum blossom bit.  I silver-soldered the ferrule, throat and chape back seams closed; the frog button is also silver-soldered in place.  I think that annealing thin sheet brass to make wrapping it around the scabbard easier also tends to lead to a sloppy appearance, and I may not do it in future.  The ferrule detailing is etched rather than embossed, so the dots and lines are flat on top and have squared edges.  Unfortunately, the staple method I devised of holding the throat in place prevents the guard from actually meeting the throat.  I will need to come up with something better in future.  Additionally, the hilt parts, throat and chape are attached with rosin-beeswax glue.

This pocket-sized dagger is roughly in the style of those made in Sheffield, England during the latter half of the 19th century, particularly (if antiques dealers may be trusted) the 1870s-1880s.  It has a very thick blade for its width, so the edges are obtuse and not well-suited for cutting.  I rarely if ever see these small daggers in frogs, so I suspect they were carried differently, but the frog button does function as a place for the thumb to push the scabbard off the blade.

Sunday, May 2, 2021

Resenter II

In the style of a Colonial American hunting sword from the 1760s-1770s, after William Moulton or John Bailey.  It uses the blade and scabbard from a replica British 1742 infantry sword via Dixie Gun Works, with pommel (#27) and belt buckle (EA) by Roy Najecki, and grip, S-guard and frog fabricated by myself.  The counterguard is an oval knife guard also from Dixie Gun Works, which I soldered a flange onto.

Other parts come from various sources which I will elaborate if anyone wants to know.  I filled the pommel with lead to provide more counterweight, then drilled holes for the tang and eyebolt.  The maple grip is stained with Minwax mahogany and finished with boiled linseed oil, and the hilt is held together with pitch glue as well as the ground-down hex nut.  Belt is stained with tea and vinegaroon, finished with neatsfoot oil and beeswax, and stitched with waxed linen cord.

Algernon de Pangim's second hunting sword (thus Resenter II) may very well have been a standard-issue infantry sword remounted by a Colonial cutler, as it's clearly lower-end as far as hunting swords go, with the brass furniture and common wood grip.

Friday, April 2, 2021

German hunting trousse, part VI

It took a long time for me to decide what to do about the fork.  I eventually came up with a solution, sort of, because the project is now going in a somewhat different direction.  We're starting with a period two-tined fork from Crazy Crow (the buffalo horn scale version only because it's the cheapest).

The first step is to remove the scales. I first wrapped the tines in a scrap of soft leather, clamped them firmly in a vise, and ground off the ends of the pins with the angle grinder flap disc in case they were peened.  They may not have been, although making the pins shorter can't hurt with the next step.  Grinding animal horn does produce a foul odor, so it would've been worth either doing outdoors or by less aggressive means (or avoiding altogether) if possible.  Luckily, I have a basement to work in.

I next gradually jimmied the scales off the tang.  This is made much easier by the fact that they aren't secured with any kind of glue.  In fact, the stuff between the scales and tang is a greasy, grimy substance similar to oil-based clay.  That might even be what it is.  I don't know why it's there, but maybe it helps prevent rust.

There was already a tiny but noticeable gap between the tang and one scale.  I inserted an X-Acto blade tip-first, first at one end, then the middle, then closer to the bolster, and continued until the gap had opened up all along one scale.  I switched to the other scale, which was loosening up, then expanded the gap with a thicker knife blade until the scales could be yanked off.

I drew the new shape of the tang on with a paint pen, then it was time for more angle grinding, and finished up by filing the edges smooth and polishing them with grades of sandpaper.

The last step in modifying the metal part itself was to straighten the tines in a vise so that they would more easily slide into the sheath.  This was not difficult - the fork appears to be made of mild or un-hardened steel - but it did result in the tines having a slightly wavy profile.

Sunday, February 28, 2021

German hunting trousse, part V

I've concluded that this unidentified steel is much harder than I'd expected.  I annealed the tang several more times, switched between different sizes of drill bits, broke four or five, and endured much screeching noises before managing to create all the small pilot holes.

In the end, I locked the blade in a vise and gradually widened the holes with a 1/8-inch round file held in a pair of pliers.  When the holes were large enough that the file slid through easily, I ran the 1/8-inch drill bit through each one from both sides, then tried to make it a shade larger with a 9/64-inch bit.  This worked for three of them, but not the remaining two.  I settled for making the holes large enough that the nickel silver pin stock would slide through without much difficulty, which is all that's really needed.


I concluded the week's work by smoothing the reshaped tang edges with a rasp, then polishing them with sandpaper up to 1500 grit and finally the Dremel's wire wheel.  The sandpaper failed to take all the rasp's scratch marks out, but they're only visible on close inspection and I'm not too ashamed.

Wednesday, February 17, 2021

Image dumping ground

I've decided to start a page which will consist of just images that I need URLs for.  Running updates, no tags, description or careful formatting.


Monday, February 15, 2021

German hunting trousse, part IV

I gave up on using the cutoff wheel and instead finished reshaping the tang with what remained of the grinder's flap disk.  So far, so good.

I finished planning the hilt with a tracing of the new tang shape.  As you can see here, the new shape leaves the original pin holes badly off-center, so a new set was required.  Luckily, I've just finished setting up a mini drill press in the basement which ought to work for this purpose...

...  but didn't, or at least not well enough.  To be frank, after how fast the flap disk reduced the edges, I expected the drill to punch through with ease like I've often done with a drill press on mild steel.  The 3/16-inch bit made the nagel hole with difficulty, but the 1/8-inch bit refused to go more than partway through.  After that, it spun and heated the tang but refused to go any deeper.  Even annealing the tang didn't help.  Now the drill bit's tip is blue and looks blunted.  I may not be able to finish this step until I pick up a replacement.

Sunday, January 31, 2021

German hunting trousse, part III

Finding a useable non-custom blade for the cleaver is pretty hard without going custom.  The most common blade is a bit like a bolo machete, but shorter and much thicker.  There were many variations, of course, but from what I can find, only rarely and rather later do we see blades that look more like modern kitchen meat cleavers.  Large "chopper" knives used for heavy woodwork somewhat resemble the classic Waidpraxe, but tend to be pricier than I want for this project.

Luckily, in my searches I stumbled across two examples that could serve as models.  One is archived at Hermann Historica and the other at Bonham's; both are identified as Saxon (in the sense of originating from Saxony), mid-17th century, and have unusually narrow blades with parallel edges.  The Bonham's example has a dropped point.

As it happens, Crazy Crow sells a large blade with a similar profile.  It's far from perfect; it's faintly bowed, lacks a fuller, and as a cleaver, it could stand to be a millimeter or two thicker.  Also, the company offers no guarantees on the steel or heat-treatment of the Indian-made lineups in this price bracket (which include the belduque I'm using in this project as a by-knife).  But its simple geometry and profile make it a unique design, and probably the best I'm going to get without going custom.  The fact that the rifleman blade has a similar cross section and the same finish as the belduque is fortuitous.

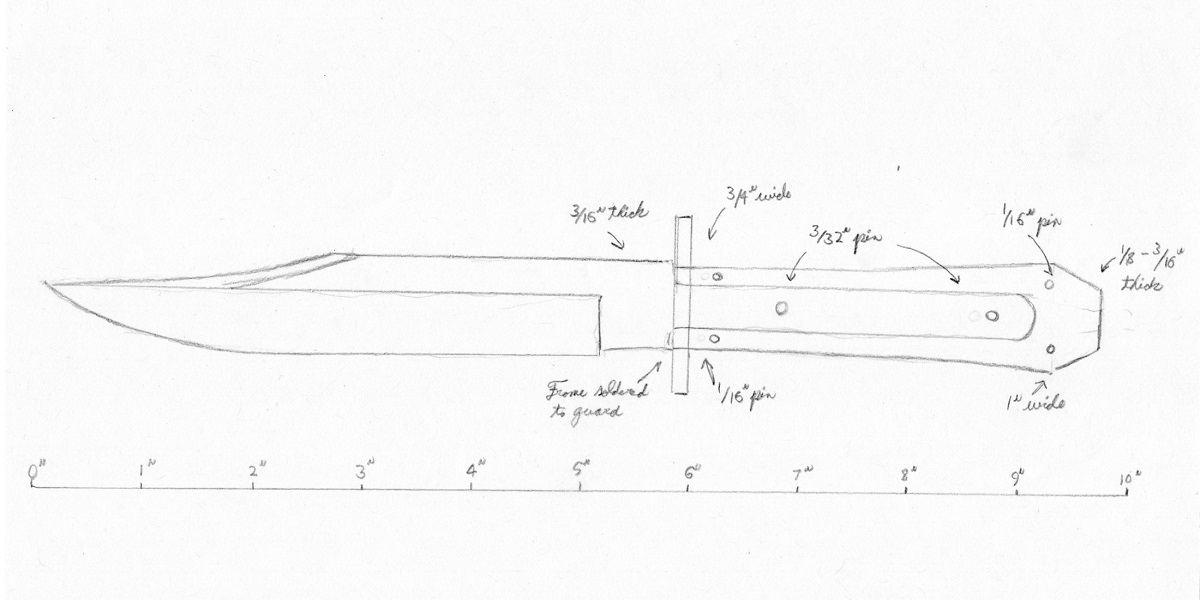
The first step in modifying it is to give its grip the classic Waidpraxe profile.  To begin with, I marked it up as you can see above.

I first attacked the tang with the scroll saw, but it wanted nothing to do with this and I was afraid all I'd accomplish would be wearing out the saw blade.  Instead, I've turned to the angle grinder, which is less suited for fine work like this but much more powerful.  Its flap disk ate away the corners of the butt end in seconds.

This kind of heavy work is what results in the blade "burning" or losing its heat treatment, which you can see near the third rivet hole where the steel is turning brown.  Clearly, I will have to proceed slowly and (if possible) use two clamps as heat sinks.

With any luck, next update in a week or two.

Saturday, January 30, 2021

Design for a frame-hilt Bowie knife

Okay, this was not meant to be an actual publicly-available post, but since I have need of an URL for this drawing elsewhere, I'm uploading it here.