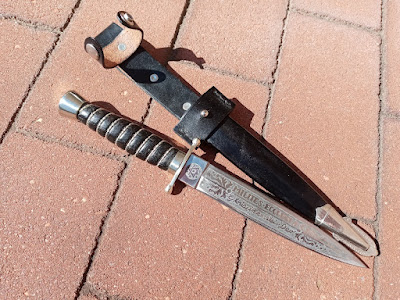
The guard and pommel are nickel silver (the pommel is called "white brass," but I suspect that in this case, they're approximately the same thing). I had to tap the pommel to match the unusual 10-32 blade thread - most blades of this sort are threaded 10-24. It was excruciating, took two tries, and gave me a blood blister on one finger. Despite my best efforts, the first pommel wound up with a badly off-center hole; the second is still slightly off-center. The ferrule and chape are fabricated from nickel silver sheet.
For a while, I was puzzled about how to make the grip. The tang doesn't taper until it reaches the threaded end, which makes filing out a hole very difficult and time-consuming. On the advice of several members of BladeForums, I built an initial grip up by ripping a 1/2-inch wide section off of each of two paper micarta scales, thinning them down to match the tang's thickness, epoxying the layers together, and then attempting to turn the assembly to shape. Unfortunately, the micarta is so smooth and impermeable that the epoxy didn't hold it together, and the assembly exploded when I tried to turn it.
In the end I used a solid wood grip and filed it out the slow way after turning. It's American walnut, double-dyed: first with vinegaroon, which turned it charcoal grey and ensured that no deep grooves maintained their natural color, then with Minwax ebony stain to turn it deep black. I did not neutralize the vinegaroon; my earlier experiments showed that a subsequent baking soda rinse turns the walnut brown (and not a nice brown like it was before). It's given linseed oil and then sealed with Tru-Oil. The spiral wrap is silver-plated copper wire which I twisted at home.

Due to the pommel being quite heavy for the blade, the retention strap with snap is absolutely necessary. I haven't mastered setting the snaps so that the internal metal deforms evenly, so the snap is still slightly less secure than I'd like. As for the double-capped rivets, they're very light; probably strong enough, but they should be domed, and without a specialized setter, hammering them to set leaves them completely flat.
The chape is the usual simple rolled cone. I made a curved tip and ground the end of the chape to fit it, soldered it on, then ground the end smooth. Then I cut out a drag to fit it, and etched it in ferric chloride. Although I tried to give it a thorough resist with permanent marker, the raised areas came out rather streaky and the etch isn't very deep. I suspect whatever formulation of nickel silver this is is more resistant to the ferric chloride than yellow brass.
Soldering the drag was also tricky, as the way the chape tapers means that the drag has to be seated on supports (I used bits of scrap brass) at a slight angle so that it will be straight relative to the chape. The chape then had to be slid in between the supports. I turned them both face-down and lay thin strips of solder on the back of the drag along the seams so that they wouldn't get onto the front and fill in the etching. There are still traces of solder on the back of the drag, so I'm sure this was the right decision.
On the whole, I'm satisfied with everything except some minor imperfections. The blade etching is definitely not as neat as the stenciled etchings of a professionally-made sword. However, keeping in mind that the real thing would actually be damascened in silver by hand instead of etched, some raggedness is to be expected in all but the most expensive versions. (As well, the fittings should all be a genuine albeit low-fineness silver alloy - plating would not be used, because it wears off with too many polishings.)
This is the generic type, issued to Milites Ecclesiæ members who weren't affiliated with a specific order. With slightly altered devices, the same lodge dagger would be issued to the Ordo Fratrum Calvariæ Loci, the Sancti Societas Vampyri Catholicæ, the Legio Sīcāriōrum, and hundreds of similar chivalric orders organized under the ME.
No comments:
Post a Comment