1 cup butter or margarine, softened
1 cup powdered sugar
1 teaspoon vanilla extract
2 cups flour
6 ounces mini chocolate chips
1/2 cup finely chopped nuts (optional)
Makes six to seven dozen
1. Preheat oven to 325 degrees Fahrenheit.
2. Mix butter, sugar and vanilla in a mixing bowl.
3. Stir in flour.
4. Mix in chocolate chips and nuts.
5. Roll and flatten one-inch balls of dough, place them two inches apart on baking sheets. Or cut or mold like shortbread.
6. Bake 20-25 minutes.
Monday, December 22, 2025
Thursday, September 4, 2025
A smallsword from Armlann Gàidhealach


It was also this experience that inspired "The children of Ailpean," which described how Ailpean Aldridge and all his descendants were cursed due to a fight between him and the Unseelie princess Cornelia. It is a matter of historical record that all his descendants on both sides of the border died before the age of 50 and violently. The sole possible exception is Andrew's father Geoffrey, who dropped dead shortly after Culloden, and even this McKay attributed to being slain by fairy-shot by Cornelia herself, whom his poem casts as the mother of Andrew and the phantom who dragged Andrew's soul away to join the Unseelie. Cornelius Ridge's "suicide" was rumored to have been murder at the hands of his lieutenant colonel and successor, Sir Laurence Pemberton. Even Robert Ridge would die in the French and Indian War at the age of 25 when his company was ambushed in the woods west of Cayuga Lake. What became of Andrew's possessions is unknown, but "The children of Ailpean" ends with O'Shaughnessy burning Andrew's body, sword and shield on a pyre and burying the remains in an old mound in Beinn Sgleatach to break the curse.
So how do I have these? Armlann Gàidhealach actually made two swords, and a number of other weapons, for Aldridge. These were listed in invoices as "1 short claybeg or 1 wee claybeg," "1 short claymore w. half-basket" "1 wee targaid w. strap," "1 wee targaid w. nae strap," "1 wee dirk w. chip knife," "1 wee dagger" and "2 belts." (What O'Shaughnessy calls a "chip" knife is what we'd call a by-knife, a miniature version of a general-purpose belt knife with a curved cutting edge, carried in a side pocket of a larger blade's sheath or scabbard. Don't ask me where she got the word "chip" from. Although "chib" is a modern Scottish word related to "shiv," these are borrowings from Romani and not attested before the 20th century, so they're unlikely to be related to O'Shaughnessy's "chip." There's also a modern style called a chip knife or chip carving knife, but it has a specialized woodcarving blade with a straight cutting edge and curved spine, so, again, it's probably not related.) The ones he actually bought were the claymore, the targe with no strap, the dirk and its by-knife, and one of the belts. I can only guess what the claymore looked like, but I suspect the targe without a strap was identical to the remaining one except with a central, probably rigid grip, and that he chose it in order to give himself greater freedom to use it like a center-gripped buckler, eliminating the aforementioned problems with a small strapped shield. The short claybeg with its matching belt, small targe with strap and small dagger comprise the part of the assemblage that he didn't buy. I have them reserved but they won't join my collection until I can pay for them. The dirk, on the other hand, was a unique piece that I'm working on reproducing from drawings; you'll see it shortly.
The blade for this sword was custom made for me by Darkwood Armory. For process pics and other information on this project, click here.
Tuesday, June 10, 2025
German hunting trousse, part XII and the unexpected problem
I settled on glueing the fork pocket with the seam inward and not to include a plate over the side pockets. Fitting the outer facing was tricky; it had to be stretched to fit smoothly over the side pockets without leaving a lot of slack sticking out the sides. For this reason I wet-molded it first.
 To try to keep the facing from crushing the side pockets, I inserted the knife and fork. To keep the facing smooth above the pockets and prevent the protruding rivet heads from making marks in the damp leather, I placed some small brass plates. The space between the top of the scabbard and top of the side pockets is almost exactly two inches.
 To get the facing to mold as closely to the core as possible, I used most of a bag of binder clips. These somehow seem to have stained the back with little black spots, possibly from exposed steel on the edges reacting with the veg-tan (similar to vinegaroon).
 Once the facing was dry, I trimmed to down to the straightest, closest edges I could manage using a combination of an xActo chisel point and scissors.
It was while punching the stitch holes that I remembered to add the belt slits, which have to be done before stitching or I would risk damaging the inner layer while cutting them. This method is, again, inspired by one used on the Bruegel messer. If I'm going to add a metal throat and a hoop supporting the top of the pockets, it's necessary to add the slits between them.
 My plan was to loosely stitch the outer layer, soak it, insert the core and tighten the stitches one by one.

 The use of two brass plates had caused a visible line across the top of the facing during the initial wet molding, so this time I added a single two-inch plate. This did seem to help.
 Unfortunately, a new problem came up at the end: It seems that some of the hide glue I added to fix the facing in place either soaked through the wet leather or got out at the seams and onto the facing. The glue appears to have interfered with the absorption of the spirit dye, so that repeated brushings of dye failed to get rid of the patchy appearance. Whether this problem can be solved at this point and how, I'm not sure.


 |


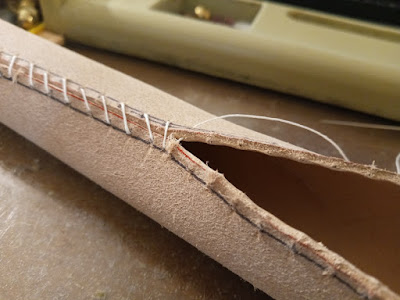
It proceeded according to plan except that I could only manage a single whipstitch with the length of linen thread I'd cut. The outer layer shrank nicely against the core. The problem of the facing above the pockets being a bit too large remains, but while unsightly, it's not too bad for me to overlook on a first attempt.


Monday, May 26, 2025
German hunting trousse, part XI
I initially intended to make a box-style wooden scabbard core for the cleaver, but after examining how the Bruegel messer scabbard is constructed and contacting Tod's Workshop, I decided to see whether I could make a similar style here.
The messer scabbard is two layers of fairly thin veg-tan. The inner layer is unstitched, while the outer layer has a flat Z-shaped double whipstitch, unlike the double running stitch I'm used to using that leaves a ridge down the back. The double running stitch is used because it helps keep the stitching away from the blade so that it's harder for the blade's point to catch on the stitching when resheathing. An unstitched layer obviates that risk entirely, but I don't know how they manage to mold the leather to the blade with no stitching holding it in place.
 In any event, I felt the need for stitching in the core layer, but also to keep the point at least somewhat away from the stitches. So after measuring and cutting the leather as usual, I trimmed it until it looked like it would just barely wrap around the blade and meet in the middle, then poked stitch holes at an angle so they came out the sides of the cut edges. I stitched with size 40 linen thread and soaked the core with alcohol. On the suggestion of Sword Buyers' Guide poster erichofprovence, I made the core and side pockets rough side out, in order to encourage better adhesion between them and the rough inner side of the facing layer when everything gets glued together. Because it seemed like it was going to be on the loose side, I tried to make sure it dried more snugly by warming it gently over a heater to shrink it, letting it spend plenty of time off the blade, and not wrapping the blade with tape.
 The side pocket for the carving knife offered no such easy solution. The 2-3oz. leather is too thin to poke angled holes out the edges. A normal butt stitch would leave the thread exposed to the knife point. A normal side welt would add unwanted bulk, and a double running center seam would create a ridge that would either prevent the pocket from lying flat against the core (if it were on the back) or be visible through the facing (if it were on the front). What I settled on was to mold the pocket so the seam ran along the blade's spine and slightly to one side and down, so that it's not threatened by the blade's point or edge and lies flat against the core.
An interesting thing to note is that the rosin varnish, even after drying in the sun and then ageing for almost two years, still gets sticky whenever alcohol gets on it.
The side pocket for the fork was simpler, and in fact I think it's better not being molded, so the leather doesn't shrink in such a way as to prevent the tines from sliding freely in and out. I did add a very small, thin welt at the tip, but this doesn't seem to prevent the tines from sliding between the stitches if the fork is pushed in too far. I don't think of this as a serious problem.


The messer scabbard is two layers of fairly thin veg-tan. The inner layer is unstitched, while the outer layer has a flat Z-shaped double whipstitch, unlike the double running stitch I'm used to using that leaves a ridge down the back. The double running stitch is used because it helps keep the stitching away from the blade so that it's harder for the blade's point to catch on the stitching when resheathing. An unstitched layer obviates that risk entirely, but I don't know how they manage to mold the leather to the blade with no stitching holding it in place.


An interesting thing to note is that the rosin varnish, even after drying in the sun and then ageing for almost two years, still gets sticky whenever alcohol gets on it.
The side pocket for the fork was simpler, and in fact I think it's better not being molded, so the leather doesn't shrink in such a way as to prevent the tines from sliding freely in and out. I did add a very small, thin welt at the tip, but this doesn't seem to prevent the tines from sliding between the stitches if the fork is pushed in too far. I don't think of this as a serious problem.


For the time being, I'm instead wondering whether to turn the fork pocket with its side seam inward or outward. The cleaver blade being a relatively narrow one, the main scabbard doesn't leave room for the knife and fork pockets to sit separately like in most hunting trousses. Instead, they'll need to overlap. For me the next question is which way will cause less of an unsightly ridge and allow the facing to lie most smoothly.


A separate issue is whether to include a leather plate with a pair of slots for the knife and fork to pass through, covering the mouths of the side pockets. Real hunting cleavers normally had a metal plate (the metal being whatever steel, brass or silver the rest of the scabbard mounts were made of, attached to a worked metal hoop that went around the entire scabbard, presumably to help prevent the mouths of the side pockets from being crushed) although I've seen one that appears to be made of either wood or leather, and absent the ability to weld, I may be forced to rely on leather. However, there may not be room for a plate here at all.
All this relates to the question of how much metal hardware I'm putting on the scabbard; the Bruegel messer's scabbard, for comparison, has none at all, and although they're from slightly different time periods, I can't help but think of the messer and trousse as forming a matching set. If I made a chape and throat for the cleaver, I'd feel compelled to make one for the messer as well.
All this relates to the question of how much metal hardware I'm putting on the scabbard; the Bruegel messer's scabbard, for comparison, has none at all, and although they're from slightly different time periods, I can't help but think of the messer and trousse as forming a matching set. If I made a chape and throat for the cleaver, I'd feel compelled to make one for the messer as well.
Tuesday, April 1, 2025
A 16th-century peasant's sword belt
Last year I bought a secondhand Tod Cutler 16thC Bruegel Messer on myArmoury. After a few modifications, including dyeing the sheath, I set about trying to figure out how to wear it.
The belts in Pieter Bruegel's (the 16th-century Low Country painter whom this sword is named after) paintings are generally narrow (maybe one inch/2.54cm), dark or black, have D-shaped buckles (though spectacle buckles are also occasionally seen) rendered in grey, and no keeper loop. They're apparently worn a bit loose and low for comfort and ease of movement since the belt appears to attach directly to the back of the messer's sheath. The Bruegel messer sheath has a pair of 1-inch slits in the back for this purpose. While possible, there's no indication that the opposite side of the belt is fixed to the clothing or another belt hidden under the outerwear — the parsimonious explanation, supported by Mikko Kuusirati when I raised the subject on myArmoury, is that the friction of the belt against the wearer's clothing is enough to hold it up.


For the moment, the belt seems to do its job, although I wonder if it would work as well if I weren't wearing a belt with my trousers for it to catch on.
Subscribe to:
Comments (Atom)