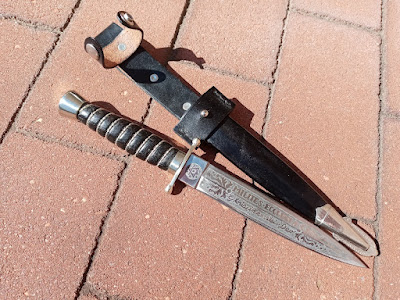
This dagger was a mini-course in processes I hadn't tried before or hadn't pushed this far. It has a Solingen-made blade with deep saltwater etching. The resist for this step is nail polish; I found that permanent marker and paint pen both rubbed off too easily, while the nail polish is very tough and can only be removed with a powerful organic solvent. The original etching came out very dark, and I found it also seemed to have a little red rust despite the blade being a fairly high-chrome stainless. (The steel-soaked q-tips also turned red very quickly.) I sprayed the blade with Ospho to neutralize the rust, but this produced a dull coating which I had to sand off, which in turn required me to re-polish the blade, removing much of the dark patina in the process. As a result, this now looks more like a typical acid-etched blade, which I guess isn't a bad thing.
The guard and pommel are nickel silver (the pommel is called "white brass," but I suspect that in this case, they're approximately the same thing). I had to tap the pommel to match the unusual 10-32 blade thread - most blades of this sort are threaded 10-24. It was excruciating, took two tries, and gave me a blood blister on one finger. Despite my best efforts, the first pommel wound up with a badly off-center hole; the second is still slightly off-center. The ferrule and chape are fabricated from nickel silver sheet.
For a while, I was puzzled about how to make the grip. The tang doesn't taper until it reaches the threaded end, which makes filing out a hole very difficult and time-consuming. On the advice of several members of BladeForums, I built an initial grip up by ripping a 1/2-inch wide section off of each of two paper micarta scales, thinning them down to match the tang's thickness, epoxying the layers together, and then attempting to turn the assembly to shape. Unfortunately, the micarta is so smooth and impermeable that the epoxy didn't hold it together, and the assembly exploded when I tried to turn it.
In the end I used a solid wood grip and filed it out the slow way after turning. It's American walnut, double-dyed: first with vinegaroon, which turned it charcoal grey and ensured that no deep grooves maintained their natural color, then with Minwax ebony stain to turn it deep black. I did not neutralize the vinegaroon; my earlier experiments showed that a subsequent baking soda rinse turns the walnut brown (and not a nice brown like it was before). It's given linseed oil and then sealed with Tru-Oil. The spiral wrap is silver-plated copper wire which I twisted at home.
The sheath is 4-5oz veg-tan, dry-stitched with black artificial
sinew (I did not use contact cement, in order to avoid any spots which wouldn't absorb dye), dyed with Fiebings Pro Dye and finished with Resolene, neatsfoot
oil and Sno-Seal. I did not apply Resolene on the flesh side this time,
and I think this prevented it from becoming too stiff. Before
stitching up the sheath, I added a screw-back button stud (nickel-plated
brass). I'd read that to prevent the button coming loose, I should put
a drop of Loctite inside before screwing it together. I used Go 2 Glue
(Loctite's all-purpose formula) and only later realized that the
Loctite in question was referring to Threadlocker. Apparently
Threadlocker Red 271 is the preferred type for setting the button
permanently.
Due to the pommel being quite heavy for the blade, the retention strap with snap is absolutely necessary. I haven't mastered setting the snaps so that the internal metal deforms evenly, so the snap is still slightly less secure than I'd like. As for the double-capped rivets, they're very light; probably strong enough, but they should be domed, and without a specialized setter, hammering them to set leaves them completely flat.
The chape is the usual simple rolled cone. I made a
curved tip and ground the end of the chape to fit it, soldered it on,
then ground the end smooth. Then I cut out a drag to fit it, and etched
it in ferric chloride. Although I tried to give it a thorough resist
with permanent marker, the raised areas came out rather streaky and the
etch isn't very deep. I suspect whatever formulation of nickel silver
this is is more resistant to the ferric chloride than yellow brass.
Soldering the
drag was also tricky, as the way the chape tapers means that the drag
has to be seated on supports (I used bits of scrap brass) at a
slight angle so that it will be straight relative to the chape. The chape then had to be
slid in between the supports. I turned them both face-down and lay
thin strips of solder on the back of the drag along the seams so that
they wouldn't get onto the front and fill in the etching. There are
still traces of solder on the back of the drag, so I'm sure this was the
right decision.
On the whole, I'm satisfied with everything
except some minor imperfections. The blade etching is definitely not as
neat as the stenciled etchings of a professionally-made sword.
However, keeping in mind that the real thing would actually be
damascened in silver by hand instead of etched,
some raggedness is to be expected in all but the most expensive
versions. (As well, the fittings should all be a genuine albeit
low-fineness silver alloy - plating would not be used, because it wears
off with too many polishings.)
This is the generic type, issued
to Milites Ecclesiæ members who weren't affiliated with a specific
order. With slightly altered devices, the same lodge dagger would be
issued to the Ordo Fratrum Calvariæ Loci, the Sancti Societas Vampyri
Catholicæ, the Legio Sīcāriōrum, and hundreds of similar chivalric
orders organized under the ME.
Sunday, February 27, 2022
Tuesday, February 8, 2022
Jagdnicker
The Jagdnicker is a traditional style of Bavarian hunting knife. Its name means "hunting nicker," the term "nicker" having no English translation that I know of but referring to a particular method of finishing a wounded game animal. In modern times the exact form varies a lot; this one is an old style, but with some modifications.
The conceit behind this one is that it's a replica of the one carried by Robin McKay. Because it's made to be carried in a marine environment, all the metal is stainless steel, except for the brass pins and lanyard tube and nickel-plated brass rivets. The blade is an 11cm graved-back flat tang from Weber Messer, which is 23cm (just over 9 inches) overall. Jagdnicker grips are classically, and almost invariably, made of antler, but I don't like working with antler - it's basically bone, so it smells foul when being ground and cracks too easily. Holding antler grips also tends to leave a funny smell on your hands. The grips on this one are ash, dyed and stabilized by K & G Finishing Supplies, epoxied and sanded up to 3000-grit before the pins are set, then waxed and buffed. The wrist loop is 2mm waxed hemp.
The sheath design is the modern German style. I made it from 4-5 ounce veg-tan; it's stitched with black nylon artificial sinew to resist rot, dyed with Fiebing's Pro in dark brown, sealed with Resolene, and finished with neatsfoot oil and Sno-Seal. I was very concerned that the knife should never fall out of the sheath when it's not in use, since if it were to plunge into the ocean, you'd never see it again. In theory, the two snaps prevent this, but I find they open slightly more easily than I'd like. They are stainless line 20 line snaps from Tandy.
Lastly, I included a belt dangler, riveted closed, with a square aluminum screw carabiner so that the sheath can be quickly removed and e.g locked in a glove compartment when one is entering an establishment where large knives are not welcome, without having to take off the belt.
I like the profile of these old-fashioned knives. However, the full flat grind from the spine makes the edge a bit too dainty for my tastes, even with the spine being 4mm thick - at this length, most utilitarian knives would have a spine of around 3mm, but also a significant secondary bevel beefing up the actual cutting edge. According to Fimbulmyrk, this very thin edge is a deliberate feature of Jagdnickers called nagelgehend (apparently translating to "nail-going"?) and I have no doubt that it would make for an extremely sharp blade capable of slicing and skinning easily.
The conceit behind this one is that it's a replica of the one carried by Robin McKay. Because it's made to be carried in a marine environment, all the metal is stainless steel, except for the brass pins and lanyard tube and nickel-plated brass rivets. The blade is an 11cm graved-back flat tang from Weber Messer, which is 23cm (just over 9 inches) overall. Jagdnicker grips are classically, and almost invariably, made of antler, but I don't like working with antler - it's basically bone, so it smells foul when being ground and cracks too easily. Holding antler grips also tends to leave a funny smell on your hands. The grips on this one are ash, dyed and stabilized by K & G Finishing Supplies, epoxied and sanded up to 3000-grit before the pins are set, then waxed and buffed. The wrist loop is 2mm waxed hemp.
The sheath design is the modern German style. I made it from 4-5 ounce veg-tan; it's stitched with black nylon artificial sinew to resist rot, dyed with Fiebing's Pro in dark brown, sealed with Resolene, and finished with neatsfoot oil and Sno-Seal. I was very concerned that the knife should never fall out of the sheath when it's not in use, since if it were to plunge into the ocean, you'd never see it again. In theory, the two snaps prevent this, but I find they open slightly more easily than I'd like. They are stainless line 20 line snaps from Tandy.
Lastly, I included a belt dangler, riveted closed, with a square aluminum screw carabiner so that the sheath can be quickly removed and e.g locked in a glove compartment when one is entering an establishment where large knives are not welcome, without having to take off the belt.
I like the profile of these old-fashioned knives. However, the full flat grind from the spine makes the edge a bit too dainty for my tastes, even with the spine being 4mm thick - at this length, most utilitarian knives would have a spine of around 3mm, but also a significant secondary bevel beefing up the actual cutting edge. According to Fimbulmyrk, this very thin edge is a deliberate feature of Jagdnickers called nagelgehend (apparently translating to "nail-going"?) and I have no doubt that it would make for an extremely sharp blade capable of slicing and skinning easily.
Tuesday, January 4, 2022
Fancy fancy knife
A "spare parts" project. I've had a kit-built Scottish dirk hanging around my house for the last 16 years or so. I was never very satisfied with it, and a few years ago, after I deciding I wanted to add a sax (not the musical kind) to my collection, I settled on using the dirk blade rather than spending more money on a new one.
This is largely a fantasy knife, although its pommel is based loosely on the Nijmegen sax. The hilt is inspired by the Thorvaldr's Sax by Matthew Berry and one created by Petr Florianek. It has a mahogany grip and holly spacers finished with linseed oil. Admittedly, the mahogany is wrong for something meant to look Northern or Western European, but it's what I had on-hand; same with the yellow brass (I believe ancient brasses were more reddish).
Since I didn't have confidence in my ability to replicate the same carving in mirror four times, I instead gave it four different animals, a horse, wolf, hart and boar. The lower two brass plates were sand-cast knife guards, while the upper two are fabricated from bar stock.
The pommel cap is fabricated from Crazy Crow stock, which seems to have a lower zinc content and grinds into an almost floury powder. I etched it with a bird of prey using ferric chloride. The top end of the tang is round and threaded; historical saxes would have rectangular ones that the hilt parts fitted tightly to. The pommel is prevented from rotating by a pair of long escutcheon pins that extend through both plates and into the grip. I ground a pair of pits into the bottom of the pommel cap to make space for the pin heads, then silver-soldered the cap onto the upper plate. The pommel button is a ground-down steel nut. The hilt is assembled with pitch glue.
The sheath is 7/8-ounce veg tan, stitched with heavy linen cord, stained with walnut dye, and finished with neatsfoot oil and beeswax. The dragon is sort of a mix of Migration-period designs (with teeth cribbed directly from the Sutton Hoo shield ornament) with those painted by Professor Tolkien. At the top of the sheath is a heart and flower taken from northern German folk art, translated into knotwork.
I'm delighted with how the homemade walnut dye worked with this project. Even after filtering, it contains fine sediments which settle into the tooling crevices, making it a natural version of a commercial leather antique gel. However, if I were using it on an un-tooled surface, I would want to use several applications to produce a darker stain, as the smooth leather here isn't a whole lot darker than it would be with just oil and wax.
I'm less delighted with the suspension tabs; specifically, setting the pins with a small hammer and anvil resulted in the tabs becoming badly dinged-up. I'm not sure whether I should try re-polishing them.
Once all the projects for Plataea 2022 are done, I might add a belt and companion knife to go with this one.
This is largely a fantasy knife, although its pommel is based loosely on the Nijmegen sax. The hilt is inspired by the Thorvaldr's Sax by Matthew Berry and one created by Petr Florianek. It has a mahogany grip and holly spacers finished with linseed oil. Admittedly, the mahogany is wrong for something meant to look Northern or Western European, but it's what I had on-hand; same with the yellow brass (I believe ancient brasses were more reddish).
Since I didn't have confidence in my ability to replicate the same carving in mirror four times, I instead gave it four different animals, a horse, wolf, hart and boar. The lower two brass plates were sand-cast knife guards, while the upper two are fabricated from bar stock.
The pommel cap is fabricated from Crazy Crow stock, which seems to have a lower zinc content and grinds into an almost floury powder. I etched it with a bird of prey using ferric chloride. The top end of the tang is round and threaded; historical saxes would have rectangular ones that the hilt parts fitted tightly to. The pommel is prevented from rotating by a pair of long escutcheon pins that extend through both plates and into the grip. I ground a pair of pits into the bottom of the pommel cap to make space for the pin heads, then silver-soldered the cap onto the upper plate. The pommel button is a ground-down steel nut. The hilt is assembled with pitch glue.
The sheath is 7/8-ounce veg tan, stitched with heavy linen cord, stained with walnut dye, and finished with neatsfoot oil and beeswax. The dragon is sort of a mix of Migration-period designs (with teeth cribbed directly from the Sutton Hoo shield ornament) with those painted by Professor Tolkien. At the top of the sheath is a heart and flower taken from northern German folk art, translated into knotwork.
I'm delighted with how the homemade walnut dye worked with this project. Even after filtering, it contains fine sediments which settle into the tooling crevices, making it a natural version of a commercial leather antique gel. However, if I were using it on an un-tooled surface, I would want to use several applications to produce a darker stain, as the smooth leather here isn't a whole lot darker than it would be with just oil and wax.
I'm less delighted with the suspension tabs; specifically, setting the pins with a small hammer and anvil resulted in the tabs becoming badly dinged-up. I'm not sure whether I should try re-polishing them.
Once all the projects for Plataea 2022 are done, I might add a belt and companion knife to go with this one.
Friday, October 29, 2021
Things That Aren't Here Anymore, part V
In a moment of prescience, I photographed the old houses on Durham Road nine years ago. Not long afterward, they were demolished to make room for an assisted living facility called The Birches.
Saturday, July 17, 2021
Garter or gambler dagger
I built this one around a German blade of unknown manufacturer or metal content which I obtained last year. It came with a hard black coating which I've tried to sand off, although there seem to be tiny crevices in the metal that made removing all of it impossible. I bought the guard from Crazy Crow some years ago; they seem (then and now) to use a faintly reddish brass, which is why it doesn't quite match the other fittings. The style of small sand-cast guards they sell has changed, becoming much more rounded at the ends.
The grip is American walnut, turned to shape - the first time I have ever created a lathed handle - flattened slightly at the butt end, and with hand-filed ridges above the ferrule. It's finished with Tried & True Varnish Oil, an old-fashioned varnish made of a mix of rosin and linseed oil such as was used in previous centuries. I followed directions from The Muzzleloading Forum member Stophel and finished the wood with shellac, adding extra rosin dissolved in turpentine to the varnish to make the final product harder. The varnish has to be cured outdoors in sunny weather and turned repeatedly to ensure that all sides are exposed to the sun.
The scabbard is 4-5oz. veg-tan, stitched with linen thread and dyed with several applications of cochineal steeped in alcohol. I finished it with neatsfoot oil and then a beeswax-linseed oil blend, thoroughly buffing off excess color in between. The fittings are all brass. At the top is a ground-down hex nut; under it is a washer to hide the width of the tang hole (the tang is not tapered except at the threaded end) and the marks from the lathe's plum blossom bit. I silver-soldered the ferrule, throat and chape back seams closed; the frog button is also silver-soldered in place. I think that annealing thin sheet brass to make wrapping it around the scabbard easier also tends to lead to a sloppy appearance, and I may not do it in future. The ferrule detailing is etched rather than embossed, so the dots and lines are flat on top and have squared edges. Unfortunately, the staple method I devised of holding the throat in place prevents the guard from actually meeting the throat. I will need to come up with something better in future. Additionally, the hilt parts, throat and chape are attached with rosin-beeswax glue.
This pocket-sized dagger is roughly in the style of those made in Sheffield, England during the latter half of the 19th century, particularly (if antiques dealers may be trusted) the 1870s-1880s. It has a very thick blade for its width, so the edges are obtuse and not well-suited for cutting. I rarely if ever see these small daggers in frogs, so I suspect they were carried differently, but the frog button does function as a place for the thumb to push the scabbard off the blade.
The grip is American walnut, turned to shape - the first time I have ever created a lathed handle - flattened slightly at the butt end, and with hand-filed ridges above the ferrule. It's finished with Tried & True Varnish Oil, an old-fashioned varnish made of a mix of rosin and linseed oil such as was used in previous centuries. I followed directions from The Muzzleloading Forum member Stophel and finished the wood with shellac, adding extra rosin dissolved in turpentine to the varnish to make the final product harder. The varnish has to be cured outdoors in sunny weather and turned repeatedly to ensure that all sides are exposed to the sun.
The scabbard is 4-5oz. veg-tan, stitched with linen thread and dyed with several applications of cochineal steeped in alcohol. I finished it with neatsfoot oil and then a beeswax-linseed oil blend, thoroughly buffing off excess color in between. The fittings are all brass. At the top is a ground-down hex nut; under it is a washer to hide the width of the tang hole (the tang is not tapered except at the threaded end) and the marks from the lathe's plum blossom bit. I silver-soldered the ferrule, throat and chape back seams closed; the frog button is also silver-soldered in place. I think that annealing thin sheet brass to make wrapping it around the scabbard easier also tends to lead to a sloppy appearance, and I may not do it in future. The ferrule detailing is etched rather than embossed, so the dots and lines are flat on top and have squared edges. Unfortunately, the staple method I devised of holding the throat in place prevents the guard from actually meeting the throat. I will need to come up with something better in future. Additionally, the hilt parts, throat and chape are attached with rosin-beeswax glue.
This pocket-sized dagger is roughly in the style of those made in Sheffield, England during the latter half of the 19th century, particularly (if antiques dealers may be trusted) the 1870s-1880s. It has a very thick blade for its width, so the edges are obtuse and not well-suited for cutting. I rarely if ever see these small daggers in frogs, so I suspect they were carried differently, but the frog button does function as a place for the thumb to push the scabbard off the blade.
Sunday, May 2, 2021
Resenter II
In the style of a Colonial American hunting sword from the 1760s-1770s, after William Moulton or John Bailey. It uses the blade and scabbard from a replica British 1742 infantry sword via Dixie Gun Works, with pommel (#27) and belt buckle (EA) by Roy Najecki, and grip, S-guard and frog fabricated by myself. The counterguard is an oval knife guard also from Dixie Gun Works, which I soldered a flange onto.
Other parts come from various sources which I will elaborate if anyone wants to know. I filled the pommel with lead to provide more counterweight, then drilled holes for the tang and eyebolt. The maple grip is stained with Minwax mahogany and finished with boiled linseed oil, and the hilt is held together with pitch glue as well as the ground-down hex nut. Belt is stained with tea and vinegaroon, finished with neatsfoot oil and beeswax, and stitched with waxed linen cord.
Algernon de Pangim's second hunting sword (thus Resenter II) may very well have been a standard-issue infantry sword remounted by a Colonial cutler, as it's clearly lower-end as far as hunting swords go, with the brass furniture and common wood grip.
Other parts come from various sources which I will elaborate if anyone wants to know. I filled the pommel with lead to provide more counterweight, then drilled holes for the tang and eyebolt. The maple grip is stained with Minwax mahogany and finished with boiled linseed oil, and the hilt is held together with pitch glue as well as the ground-down hex nut. Belt is stained with tea and vinegaroon, finished with neatsfoot oil and beeswax, and stitched with waxed linen cord.
Algernon de Pangim's second hunting sword (thus Resenter II) may very well have been a standard-issue infantry sword remounted by a Colonial cutler, as it's clearly lower-end as far as hunting swords go, with the brass furniture and common wood grip.
Friday, April 2, 2021
German hunting trousse, part VI
It took a long time for me to decide what to do about the fork. I eventually came up with a solution, sort of, because the project is now going in a somewhat different direction. We're starting with a period two-tined fork from Crazy Crow (the buffalo horn scale version only because it's the cheapest).
The first step is to remove the scales. I first wrapped the tines in a scrap of soft leather, clamped them firmly in a vise, and ground off the ends of the pins with the angle grinder flap disc in case they were peened. They may not have been, although making the pins shorter can't hurt with the next step. Grinding animal horn does produce a foul odor, so it would've been worth either doing outdoors or by less aggressive means (or avoiding altogether) if possible. Luckily, I have a basement to work in.
I next gradually jimmied the scales off the tang. This is made much easier by the fact that they aren't secured with any kind of glue. In fact, the stuff between the scales and tang is a greasy, grimy substance similar to oil-based clay. That might even be what it is. I don't know why it's there, but maybe it helps prevent rust.
There was already a tiny but noticeable gap between the tang and one scale. I inserted an X-Acto blade tip-first, first at one end, then the middle, then closer to the bolster, and continued until the gap had opened up all along one scale. I switched to the other scale, which was loosening up, then expanded the gap with a thicker knife blade until the scales could be yanked off.
I drew the new shape of the tang on with a paint pen, then it was time for more angle grinding, and finished up by filing the edges smooth and polishing them with grades of sandpaper.
The last step in modifying the metal part itself was to straighten the tines in a vise so that they would more easily slide into the sheath. This was not difficult - the fork appears to be made of mild or un-hardened steel - but it did result in the tines having a slightly wavy profile.
The first step is to remove the scales. I first wrapped the tines in a scrap of soft leather, clamped them firmly in a vise, and ground off the ends of the pins with the angle grinder flap disc in case they were peened. They may not have been, although making the pins shorter can't hurt with the next step. Grinding animal horn does produce a foul odor, so it would've been worth either doing outdoors or by less aggressive means (or avoiding altogether) if possible. Luckily, I have a basement to work in.
I next gradually jimmied the scales off the tang. This is made much easier by the fact that they aren't secured with any kind of glue. In fact, the stuff between the scales and tang is a greasy, grimy substance similar to oil-based clay. That might even be what it is. I don't know why it's there, but maybe it helps prevent rust.
There was already a tiny but noticeable gap between the tang and one scale. I inserted an X-Acto blade tip-first, first at one end, then the middle, then closer to the bolster, and continued until the gap had opened up all along one scale. I switched to the other scale, which was loosening up, then expanded the gap with a thicker knife blade until the scales could be yanked off.
I drew the new shape of the tang on with a paint pen, then it was time for more angle grinding, and finished up by filing the edges smooth and polishing them with grades of sandpaper.
The last step in modifying the metal part itself was to straighten the tines in a vise so that they would more easily slide into the sheath. This was not difficult - the fork appears to be made of mild or un-hardened steel - but it did result in the tines having a slightly wavy profile.
Subscribe to:
Posts (Atom)


