Tuesday, December 29, 2020

Wheel hat

 
This is actually the first hat that I made using the PDF pattern I downloaded from Etsy two years ago, although it's only in the last few weeks that I've reworked it to the point that I find it good enough.  Since it's cloth, I needed help from Mom to assemble the top and sides.

The facing fabric is from an old pair of chinos.  I used a narrow belt from a thrift store for the chin cord and 4-5 ounce (2mm) veg-tan for the visor.  The visor is treated only with neatsfoot oil, conditioner and a little Sno-Seal (emulsified beeswax), which all contribute to darkening the leather to a natural saddle tan color.  With no dye, the color shouldn't rub off or bleed, and with no acrylic finish, it won't crack if creased.  It's also reasonably water-resistant, though less so than a heavy acrylic finish would be, and of course a glossy finish isn't achievable.  If I'd been thinking ahead, I might have made it without vents and used a more old-fashioned slide system for the chin cord, which would make the hat appropriate for the 19th century.  As is, I believe the roller buckle is more of a 20th-century feature.

The band is built around heavyweight, 2mm cotton webbing, 1-1/2 inches (38mm) wide.  I sewed the crown to the band five warp threads down, though I think it could've been three or even two, which would add a bit of height to the band without weakening the construction.  Of course, with a fisherman-style cap like this, you don't really want a tall band; that's more a military peaked cap feature.  Speaking of which, the crown could also stand to be about a quarter-inch narrower all around when working with a forgiving fabric, though this doesn't seem to work with leather unless you make the band taller.

After sewing in the visor, I hot-glued a sweatband of cotton twill tape with the idea that it would be replaceable (since the cap itself can't be washed and its light color will show stains from contact with greasy skin), but it took up too much room on the inside.  Also, the twill tape had a hard face and was uncomfortable, and proved very difficult to remove.  I managed to peel it out and slice off most of the remaining hot glue, and have now replaced it with a chamois leather sweatband in just the front half (where most grease tends to accumulate), attached with rubber cement.  It's still a little too snug - I definitely underestimated the hat size during construction - but much more comfortable.  The crown has lightweight interfacing and is lined with part of a worn-out cotton bedsheet.

I tweaked the visor pattern several times.  I found the supplied version (right) too flat and a bit too proportionally long.  At first I thought that widening it would be the best way to get it to curl down more, but in the last few weeks I realized that the major factor is how curved it is on the interior edge:  the less curved, the more the visor is turned down when stitched to the straight edge of the band.  Theoretically, a completely straight interior edge would result in a visor that points straight down.  There actually appear to have been wheel hats made in the 19th century like that, although I don't see the point of such a thing.  This cap uses the pattern second to the left, which is perhaps slightly too narrow and not quite full enough on the outer edge near the corners to optimally shield one's eyes from the Sun.

Friday, October 9, 2020

Biker cap

 
Yesterday I finished one more small leather cap.  This one is basically the same as the one I made in 2019, with some largely aesthetic differences.

The crown and band aren't factory scrap this time, but the remnants of a Mirrabella lambskin I bought some years ago.  Although the one I bought was officially some shade of brown, it looks almost black in most lighting, though it may fade with exposure to sunlight.  I matched it with a black chin cord and artificial sinew stitching and a visor made from the same almost-black oiltan as I used on the last one.  The lambskin is thinner than the unidentified factory scrap, so the cap weighs less.  Also, despite having a wider crown, it crushes down better, giving it a casual look when worn.

Fitting is the only fussy part.  I tried to size the band to be just large enough to fit my oversized head, excessive hair, and a polarfleece sweatband lining.  Unfortunately, this resulted in it being a little too big for the crown, forcing me to pleat as I went and causing unsightly crimping in a few spots.

The band is made of medium-weight two-inch cotton webbing.  The crown is lined with scrap twill, probably cotton.  The buckle is chromed steel.  Though the buttons also look like steel, I later discovered that they won't stick to a magnet, so they're probably pot metal, which raises the possibility that their shanks may break more easily with use.  Otherwise, construction is exactly the same as the last one.

Monday, September 28, 2020

18th-century cutlass belt

This is the first complete sword belt of any kind that I've made.  I intended to do it on the cheap but still stick to period materials as best as possible.

The buckle is by Roy Najecki (item EA here).  You can order it with or without a tongue; I ordered mine with one.  The tongue is iron and rather sharp.

The leather is all vegetable-tanned.  It's stained with double-strength, heavily steeped black tea and vinegaroon; the tea supposedly enriches the leather with extra tannins for the vinegaroon to react with so that the leather's own tannins won't be depleted, which would result in degradation and cracking over the years.  The vinegaroon itself is iron (in this case fine steel wool) dissolved in vinegar.  This is not a dye, but a reagent; it looks like pond water or tea, but turns tannins black.  After staining the leather, I neutralized the vinegaroon in a mild baking soda solution until it stopped fizzing.  It's finished with neatsfoot oil and beeswax.

The stitching is coarse waxed linen cord, since I wasn't sure fine stitching would be strong enough.  To keep the end knots from chafing against clothing, they're on the outside, which gives it a rather sloppy appearance.

The frog fits the scabbard in the same way as my Bowie knife frog:  The sleeve is slightly oversized for the scabbard and pops open when pressed from the sides so it becomes tall enough to slide over the button, allowing the button to be pressed through a round buttonhole, which is just wide enough for the button's neck but has a slit to either side to let the button through.  While I was test-fitting it after stitching, I found that the sleeve was a little too tight for me to easily get the scabbard back out.  So I had to finish attaching the frog to the belt itself with the scabbard encumbering it.

Most replica sword belts of this kind that I've seen are upwards of two inches wide.  This one is only 1-1/4 inches, in accordance with guidelines at Gentlemen of Fortune.  It chafes a lot when worn over only a shirt, but on top of a waistcoat or justaucorps it would probably be okay.  It's also a very functional design, in that when buckled tight enough, it allows you to draw the sword one-handed.

This sword is a Dixie Gun Works 1742 British infantry sword.  It's a nice sword for the money, but I'll soon be attempting to replace the hilt.  You'll see whether or not that turns out in another month or two.

Thursday, July 16, 2020

Indo-Persian letter opener

For his birthday this year, my dad asked for a letter opener.  I wonder if he didn't ask for one just because he knew it was a project I'd enjoy, but anyway, I took the first idea that came to mind and ran with it.

This is based loosely on a number of roughly 17th- to 19th-century khanjars, most often seen with curved blades but sometimes with straight ones.  It uses a Windlass full-tang dagger blade with a modified butt end.  This blade is in fact the same one as from the letter opener I made five years ago; I ordered a new one, but the new one was slightly longer and with less distal taper than the old one, and didn't fit the scabbard core I'd created.  (It, along with the large "companion" blade I ordered earlier this year, also have squared edges of around a millimeter thick, and I wonder if this is a sign of a decrease in quality control.)

Because the handle should be low-maintenance, I finished the holly grips with Tru-Oil, which, unlike linseed oil, forms a hard, glossy top coat.  The hardware is all brass.  I cut the bolsters from 3/16-inch (4.76mm) bar stock, shaped them to the correct profile with an angle grinder, polished the edges, then epoxied them in place for pinhole drilling and cross-section shaping.  I drilled flared openings to the pinholes with a Dremel high-speed cutting cone so that the pins would hopefully mushroom to fit these openings rather than forming protruding domes.  Once the pins were peened, I smoothed off the faces of the bolsters with the angle grinder, a rasp and polishing paper to produce a flush surface.

The scabbard was fairly quick to make, since I already had a wooden core on-hand fitted to this exact blade and some thin green leather, stitched with black simulated sinew.  (Velvet would be more appropriate, but regardless, most antique Indian knives I've seen have either a green or red facing material.)  I at first tried to do a cross-X stitch, but that placed so much strain on the leather that it tore and I had to replace the entire facing.

The throat and chape are sheet brass, with classic Mughal leaf decoration drawn freehand in permanent marker for a resist and ferric chloride-etched.  A soldered tab holds a suspension ring.  A few originals I've seen have a cord tied to the suspension ring, which I understand would be used for attaching the scabbard to a belt, but in this case it seems less effective because the blade is very light, causing the whole assembling to hang handle-down when tied to a belt.  This is perhaps less important in this application than it might be elsewhere, since it's unlikely that Dad will actually wear this letter opener, but it would be nice nonetheless to figure out a way to make it work anyway.  A second suspension ring on the other side of the throat might help; however, I suspect that any system which doesn't involve lashing the scabbard tightly to the belt will be ineffective on account of the balance.  The chape has a soldered brass bead for a finial, capped off at the other end with an escutcheon pin; the chape and throat are also soldered up the back.

Tuesday, July 7, 2020

Homo tolkiensis

Just spitballing here, but imagine the so-called Indonesian hobbits, Homo floresiensis, as actual hobbits.  I think it's pretty fitting.

Thursday, July 2, 2020

Gee, Your Breath Smells Horrific

1 cup mayonnaise
1/2 cup plain yogurt or sour cream
3 tablespoons dried minced onions
1-1/2 teaspoons powdered garlic
1/8 teaspoon ground black pepper
1 tablespoon prepared yellow mustard
1-1/2 teaspoons Louisiana-style hot sauce

Mix everything in a jar or tupperware and refrigerate for at least half an hour to let the onions rehydrate.

Use with e.g. deli sandwiches; burgers; green salad; tuna or potato salad; crudite, fries or chips.

I use 1/2 cup each of regular mayonnaise, light mayonnaise and nonfat yogurt, but I am told that using a full cup of regular mayonnaise and leaving out the light would be better if you were putting it ahead of time on anything absorbent, e.g. potato salad or a sandwich.

The amount of hot sauce and pepper isn't enough to make it hot.

Thursday, June 18, 2020

Sheffield-style Bowie

Although I've only read it once, now nine years ago, one of the novels I've found most moving is Catch-22, by Joseph Heller.  Incidentally, there's a couple passages where Yossarian ponders stabbing Orr with the hunting knife slung from the mosquito net bar over the dead man's cot.  I forgot until recently that it wasn't just any odd knife that could qualify as a "hunting knife" (of which there's a wide spectrum of designs meant for different tasks involved in hunting).  It actually receives a little bit more description in one passage, where it's stated to be "long" and "bone-handled."

I always had in mind to make it in an Old Western style.  I settled on a "classic clip point" Bowie from Crazy Crow.  It features a guard from the same source, sold as "white brass" - this may mean either very high-alloy brass or nickel silver, but since it has the same color and working properties as the latter, I assume that's what it is - and matching cutler's pins, escutcheon plate and scabbard hardware.  I did have to rely on yellow brass for the escutcheon pins and the staple holding the throat.  Since I dislike working with bone, I used a pair of holly scales, finished with linseed oil, which coincidentally imparts a color to pale wood not dissimilar to antique bone.  According to the Wood Database, holly typically has a janka hardness comparable to black walnut, but the hardness and density of a tree trunk varies with growing conditions and the scales I used seemed little harder than poplar.

This time around, I tried to use only pre-modern materials wherever possible.  The sheath and frog are unstained veg-tan, finished with neatsfoot oil and then a thin coat of beeswax melted in, and stitched with waxed linen thread.  Admittedly the beeswax is in the form of Sno-Seal, which is softened with a volatile solvent to make it spreadable at room temperature, but the only modern material remaining in the finished knife is two-part epoxy used to reinforce the attachment of the scales, throat and chape.  Both the throat and chape are seamed up the back and silver-soldered.  Because I don't have the skill to produce a smooth round end to the chape, I instead left it with a round opening closed by a soldered flat plate - which isn't correct as far as I know for this type of knife; it really looks like something more appropriate to a Napoleonic-period spadroon or naval dirk.  The frog button is attached the same way, using a leftover bronze stub from another project as the "neck."

The frog itself was a bit of a puzzle to me until I noticed that a number of originals have frogs significantly wider than the scabbards themselves.  This means that pressing the stitched edges of the frog together makes the middle pop open wide enough to fit around the scabbard, button and all, and the buttonhole can then be pressed down around the button provided the hole is large enough and has a wide enough horizontal slash to either side.  While it strikes me as needlessly complicated compared to the more modern style of making the sheath side-seamed with an integral belt loop, it does work perfectly well for holding the scabbard in place while unsheathing and resheathing the knife.

While I was at it, because this blade, the matching guard and wooden scales are so cheap, I ordered another set which I hope to later turn into a "sister" knife.  This one will have curly maple scales, brass hardware, and leather blackened with vinegaroon.  I think yellow brass pairs better with darker woods and leathers than lighter ones.

These blades require a lot of work off-the-shelf.  The tangs are wide enough to be considered slab tangs, but don't come with pin holes drilled, and being upwards of 5mm inch thick, they took a lot of effort to drill through, moreso because apparently EN 45 steel requires more care to anneal than just heating it to red-hot and letting it cool on its own.  I made the pin holes on the first knife 1/8 inch, but these struck me as too big because of how there are two of them side-by-side next to the junction of the tang and blade, possibly creating a stress point that's larger than necessary.  Antique Sheffield Bowies often appear to use thinner pins.  So I plan to make the holes and pins on the second knife 3/32 inch wide.

The blades come with an edge ground on, but are otherwise brut de forge.  The hammermarks are too deep to remove entirely unless you want to make the blades significantly thinner.  The first one measured 4.5mm (nominal thickness 3/16 inch, or ~4.76mm) before polishing and a hair over 4mm afterward, which is still decent for a blade this length.  I've seen very few original 19th-century blades that were this rough-looking, and real Sheffield Bowies always seem to have a nice even finish, so I assume they were either thicker before finishing or less deeply hammermarked to begin with.  The rough look still works if the conceit is that this isn't a Sheffield Bowies per se, but rather a domestically-made one in the popular imported style - which is, of course, exactly what it is.

The butt ends of the tangs have to be shortened and look better when slightly rounded.  I gave the tangs a very slight waist with an angle grinder so as to provide a more secure grip, since the straight-edged, peg-shaped grips seemed likely to slip out of the hand, especially when paired with smooth wood scales.  But I felt they were too narrow to be made much narrower without leaving the grip uncomfortable.  Instead, I followed a suggestion from Mikko Kuusirati at myArmoury and tapered the scales toward the guard (i.e. they are thicker at the butt end).  Lastly, the tang on the first blade met the ricasso ever so slightly closer to the edge than the spine, which made for an unappealing look.  Since these blades have a saber grind, they can tolerate losing width on the spine, which I achieved with a few quick passes of the angle grinder (this incidentally also flattened the spine and removed all remaining pits and scale).

The guards also require some work:  The slots are designed for hidden-tang blades and need to be tediously filed until they're wide enough.  Luckily, the crowns on the guards are exactly the same width as the blade tangs, so neither needed adjustment.  I shimmed and silver-soldered the guard and then packed any remaining gaps with a beeswax-linseed oil mix to ensure no water gets in and causes corrosion, though historically cutler's resin might've been a more likely choice.

One last note:  I am not a hunter, and I understand that many hunters find the large-ish (but far short of machete- or cleaver-sized) Bowie knife with a centered clip point and a quillon on the spine side ill-suited for any particular field task.  The Bowie is a fighting knife, or at least a multi-purpose one, and the features that make it suitable for fighting are detrimental to some other uses.  So I won't argue either way about the appropriateness of the name.  That being said, this style is frequently referred to as a hunting knife and I see no reason Yossarian would've analyzed its suitability for various jobs before casually describing it as one.

Tuesday, May 19, 2020

Solingen mini-hunter

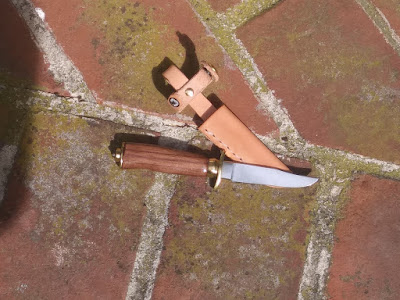
This is a replica of one of Jimmy Bagdasarian's early pocketknives, which he assembled in the summer of 1980 and carried through middle school before giving to classmate Lauren Thomas.  It's made from a vintage Solingen blade I bought from Crazy Crow Trading Post.  As such, it's loosely styled after a hunting knife that would've been made in the 1970s, and features some finishing choices that I've moved away from since I started this hobby.

The grip is American walnut with Formby's varnish.  It has a squashed 3/8" compression ring for a ferrule and the tang is secured with a ground-down hex nut (I set aside the nut that's supplied with the blade, and will probably give it away eventually).  The guard and buttcap are fabricated from 14-gauge brass.

Its sheath is undyed and unfinished veg-tan, stitched with dental floss.  It'd be prudent to at least give it some leather conditioner at a later date; however, I wanted to leave it "natural" for at least the first published photos.  Without a water-repellent conditioner or finish, it could also be given some decorative tooling.

Sunday, April 12, 2020

German hunting trousse, part II

Some German hunting knives and other equipment of the period with non-ferrous hardware had applied flanges and I wasted much time debating with myself about whether this was something I wanted to try.  In the end I decided it would be too easy to screw up.

I stained, thinned down and shaped the ash scales, then finished them with linseed oil.  The oil, unfortunately, brought out the wood grain strongly, and I don't think anyone giving these grips a close look in person would mistake them for antler.  A better choice than ash might be holly, plain maple, or even light-colored poplar, although knifemakers seem to consider poplar a poor choice due to its softness (it's said to dent much too easily unless saturated in stabilizer).

In the meanwhile there were also the washers to make.  Judging from photos of antiques, the smaller pieces of a hunting trousse most often had one highly-domed rivet or a pin set with a pair of washers at the top of the tang and simple pins for the rest, while the cleaver would usually have its scales attached entirely with domed rivets or washers.  Since I can't get solid nickel silver rivets that are just right, the heads have to be attached separately.  Radovan Geist suggested using upholstery tacks with the pins cut off and holes drilled in the middle, which he used on his amazing 17th-century Jagdmesser earlier this year, but previous experience has shown that I'm no good at keeping circular metal objects from spinning while drilling the middle.  Kellam Knives also sells premade rivet heads which would be perfect for this use; it's just that two each of them on the knife, fork and bodkin plus up to ten for the cleaver would come to almost $56 and I didn't want to spend that much.

Instead, I fabricated some washers from a half-inch strip of 14-gauge nickel silver.  First I marked off half-inch segments, then knocked a dent in the middle of each with a nail, to act as a pilot hole.

 The blackened end of the strip was from my attempt to anneal it.  This doesn't work with nickel silver like it does with brass.

The holes were drilled thusly:  I set the nickel strip on a board and hammered escutcheon pins into the wood around it so that the pin shafts prevented the strip from spinning around and the heads would keep it from flipping outward.  This worked well enough, but for some reason I couldn't keep the holes centered:  Almost all of them wound up to one side - the same side, no matter how I tried to correct the drill's angle.  This is one of the many, many times I regret not having space or money for a drill press.

After cutting the washer blanks into octagons, I soldered two of them onto the ends of a scrap of brass rod, then used a stone Dremel bit to grind them round and slightly domed (for which reason it was important to get the thickest nickel stock I could find).  At first I used low-temperature solder paste, but this proved too weak, and the washers broke free while being ground.  I tried again with silver solder, which worked, although it has its own drawback in that the solder is so strong that I could only remove the washers from the rod by re-melting the solder.  I heated the washers with a blowtorch while holding the rod with a pair of heavy pliers.  When the washers were red-hot, I grabbed another pair of pliers in my other hand to quickly pry them off.

After further cleanup with files and then polishing, the washers were ready to attach.  I set the scales with epoxy and nickel silver pins in the usual fashion.  Because nickel silver doesn't anneal (or at least I haven't yet figured out how to do so), the kind of plastic deformation involved in peening the pins is, well, harder.  Still, it's not a huge undertaking.

Setting the pins causes some metallic discoloration of the surrounding wood where the hammer hits it, which I have to then sand, brush the sawdust off of, and oil one more time.  The pin with the washers at the end was by far the easiest one to set, which makes me wonder why all such knives didn't have washers on all the pins.

I haven't made a sheath for this knife.  If all goes well, it'll wind up not as a belt knife but carried in a cleaver sheath side pocket alongside its siblings.

Friday, March 13, 2020

German hunting trousse, part I

I've recently developed an interest in acquiring an old German hunting trousse of the type that was used in 17th and 18th centuries.  These were sets of culinary tools used in the processing of big game such as deer and boar.  Typically a trousse would include a Waidblatt or Waidpraxe (hunting cleaver), one or two by-knives, and a carving fork and/or an awl-like tool, the function of which is variously believed to be either a simpler version of a fork or a sharpening steel.  These would all have matching hilts.  Since they were tools of aristocrats (as the saying went, "Das Jagen/Ist Ein/altes Recht/es gehöret/für den Adel/und Sein/geschlecht"), they were rather ornate, often with silver furniture.

I have, as yet, no idea where to acquire blanks for the cleaver, awl or fork (standard carving forks are much too large, and replica 18th-century table forks have tines that are too short and necks that are too long).  The by-knife would also be a little uncertain.  The flat-tanged varieties of traditional Jagdnicker strongly resemble it, but have thickened shoulders that would be difficult to grind away cleanly.

An alternative presented itself, however.  It is marketed as a "mini" version of a Spanish belduque.  Whether it's an accurate replica of that is neither here nor there as far as my purposes are concerned, but I had a gift card to Amazon, so it's as good a choice as any.  And that's why this is where I'm starting the project.

The belduque arrived with a somewhat loose-fitting sheath, a full-bellied grip with horn scales, and a rather poor secondary bevel which is not really visible in my photos.  The blade is 3mm thick at the shoulder, about half again more than the heaviest modern paring knives I've handled, with much less distal taper.  I like this because I figure if the heat-treatment is poor on this cheap knife, the thicker blade will ameliorate it somewhat.

Another thing to note is that the bolster, while it may look deep yellow in the catalogue photo, actually appears to be nickel silver (also known as German silver), an alloy of copper, zinc and nickel with only a faint yellowish tinge.  This isn't a bad thing, since nickel silver, as its name implies, looks a lot like real silver (though more durable and less prone to ugly tarnish) and the original hunting trousses often had silver furniture, while I've never seen one with brass.  It does, however, make obtaining furniture a little more complicated and expensive.

Obviously, the first thing to do was get rid of the scales.  I ground off the ends of the pins, then gradually wedged an X-Acto blade between the scales and the tang, and then thicker blades until the scales were forced off.

You don't get to see the removed scales, since I threw them out weeks ago.

The original by-knives rarely if ever had bellied grips; indeed, to judge by the many photos I've looked at, straight-sided grips are one of the distinguishing features between these and modern ones.  So some trimming is in order.

I set the tang in a heavy vise and erased the markered edges with an angle grinder.  Grinding metal generates a lot of heat, enough to anneal the blade (i.e., ruin the heat-treatment) if left unchecked, and if I were working on the blade I would tend to pause frequently and rub the blade down with an ice cube.  But the vise, which is in essence two big chunks of steel, acts as a heat sink -- when I'd finished grinding, the tang was only slightly warmed.  Also, the vise prevents me from accidentally grinding off too much.

Found some nickel silver rods on eBay at a slight discount because they're tarnished...  I don't know why that matters because it shouldn't take more than a couple minutes with some Brasso to deal with it, but in this project even polishing is redundant since only the very ends will even be visible.  Anyway, luckily I was able to get more than enough for the entire project and one or two more all at once.

The correct material for the scales is deer antler, but I hate working with antler.  It's foul-smelling and cracks too easily for my tastes.  Instead I'm using some yellow ash.

The ash is cut, shaped and textured with various rotary tool attachments.  The cutting wheel really isn't the right tool for this job, as it breaks much too easily, and explosively, as well as producing a ton of smoke.  But in the absence of a power saw, this was the fastest way to get the job done, and I am nothing if not impatient about certain tasks.

I wrapped up today's work by applying wood stain to the textured tops of the scales.  I intend to let it dry for a week or so, then sand the scales to their final shape.  With any luck, the sanding will remove most of the stain, leaving color only in the grooves, and provide a look similar to genuine antler.