Sunday, February 28, 2021

German hunting trousse, part V

I've concluded that this unidentified steel is much harder than I'd expected.  I annealed the tang several more times, switched between different sizes of drill bits, broke four or five, and endured much screeching noises before managing to create all the small pilot holes.

In the end, I locked the blade in a vise and gradually widened the holes with a 1/8-inch round file held in a pair of pliers.  When the holes were large enough that the file slid through easily, I ran the 1/8-inch drill bit through each one from both sides, then tried to make it a shade larger with a 9/64-inch bit.  This worked for three of them, but not the remaining two.  I settled for making the holes large enough that the nickel silver pin stock would slide through without much difficulty, which is all that's really needed.


I concluded the week's work by smoothing the reshaped tang edges with a rasp, then polishing them with sandpaper up to 1500 grit and finally the Dremel's wire wheel.  The sandpaper failed to take all the rasp's scratch marks out, but they're only visible on close inspection and I'm not too ashamed.

Wednesday, February 17, 2021

Image dumping ground

I've decided to start a page which will consist of just images that I need URLs for.  Running updates, no tags, description or careful formatting.


Monday, February 15, 2021

German hunting trousse, part IV

I gave up on using the cutoff wheel and instead finished reshaping the tang with what remained of the grinder's flap disk.  So far, so good.

I finished planning the hilt with a tracing of the new tang shape.  As you can see here, the new shape leaves the original pin holes badly off-center, so a new set was required.  Luckily, I've just finished setting up a mini drill press in the basement which ought to work for this purpose...

...  but didn't, or at least not well enough.  To be frank, after how fast the flap disk reduced the edges, I expected the drill to punch through with ease like I've often done with a drill press on mild steel.  The 3/16-inch bit made the nagel hole with difficulty, but the 1/8-inch bit refused to go more than partway through.  After that, it spun and heated the tang but refused to go any deeper.  Even annealing the tang didn't help.  Now the drill bit's tip is blue and looks blunted.  I may not be able to finish this step until I pick up a replacement.

Sunday, January 31, 2021

German hunting trousse, part III

Finding a useable non-custom blade for the cleaver is pretty hard without going custom.  The most common blade is a bit like a bolo machete, but shorter and much thicker.  There were many variations, of course, but from what I can find, only rarely and rather later do we see blades that look more like modern kitchen meat cleavers.  Large "chopper" knives used for heavy woodwork somewhat resemble the classic Waidpraxe, but tend to be pricier than I want for this project.

Luckily, in my searches I stumbled across two examples that could serve as models.  One is archived at Hermann Historica and the other at Bonham's; both are identified as Saxon (in the sense of originating from Saxony), mid-17th century, and have unusually narrow blades with parallel edges.  The Bonham's example has a dropped point.

As it happens, Crazy Crow sells a large blade with a similar profile.  It's far from perfect; it's faintly bowed, lacks a fuller, and as a cleaver, it could stand to be a millimeter or two thicker.  Also, the company offers no guarantees on the steel or heat-treatment of the Indian-made lineups in this price bracket (which include the belduque I'm using in this project as a by-knife).  But its simple geometry and profile make it a unique design, and probably the best I'm going to get without going custom.  The fact that the rifleman blade has a similar cross section and the same finish as the belduque is fortuitous.

The first step in modifying it is to give its grip the classic Waidpraxe profile.  To begin with, I marked it up as you can see above.

I first attacked the tang with the scroll saw, but it wanted nothing to do with this and I was afraid all I'd accomplish would be wearing out the saw blade.  Instead, I've turned to the angle grinder, which is less suited for fine work like this but much more powerful.  Its flap disk ate away the corners of the butt end in seconds.

This kind of heavy work is what results in the blade "burning" or losing its heat treatment, which you can see near the third rivet hole where the steel is turning brown.  Clearly, I will have to proceed slowly and (if possible) use two clamps as heat sinks.

With any luck, next update in a week or two.

Saturday, January 30, 2021

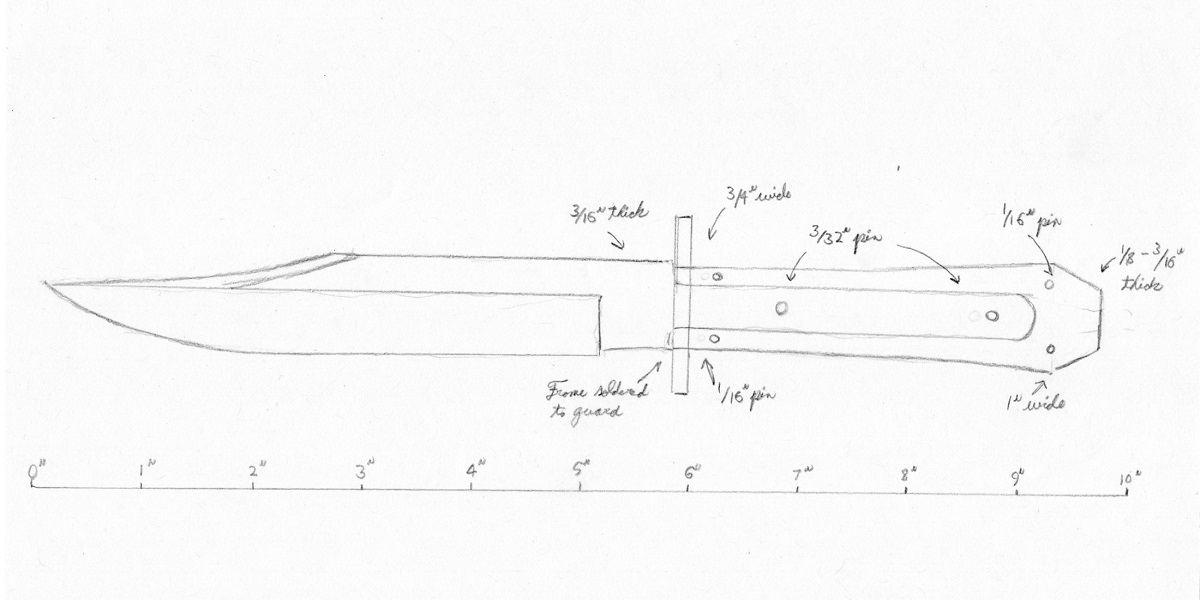
Design for a frame-hilt Bowie knife

Okay, this was not meant to be an actual publicly-available post, but since I have need of an URL for this drawing elsewhere, I'm uploading it here.

Tuesday, December 29, 2020

Wheel hat

 
This is actually the first hat that I made using the PDF pattern I downloaded from Etsy two years ago, although it's only in the last few weeks that I've reworked it to the point that I find it good enough.  Since it's cloth, I needed help from Mom to assemble the top and sides.

The facing fabric is from an old pair of chinos.  I used a narrow belt from a thrift store for the chin cord and 4-5 ounce (2mm) veg-tan for the visor.  The visor is treated only with neatsfoot oil, conditioner and a little Sno-Seal (emulsified beeswax), which all contribute to darkening the leather to a natural saddle tan color.  With no dye, the color shouldn't rub off or bleed, and with no acrylic finish, it won't crack if creased.  It's also reasonably water-resistant, though less so than a heavy acrylic finish would be, and of course a glossy finish isn't achievable.  If I'd been thinking ahead, I might have made it without vents and used a more old-fashioned slide system for the chin cord, which would make the hat appropriate for the 19th century.  As is, I believe the roller buckle is more of a 20th-century feature.

The band is built around heavyweight, 2mm cotton webbing, 1-1/2 inches (38mm) wide.  I sewed the crown to the band five warp threads down, though I think it could've been three or even two, which would add a bit of height to the band without weakening the construction.  Of course, with a fisherman-style cap like this, you don't really want a tall band; that's more a military peaked cap feature.  Speaking of which, the crown could also stand to be about a quarter-inch narrower all around when working with a forgiving fabric, though this doesn't seem to work with leather unless you make the band taller.

After sewing in the visor, I hot-glued a sweatband of cotton twill tape with the idea that it would be replaceable (since the cap itself can't be washed and its light color will show stains from contact with greasy skin), but it took up too much room on the inside.  Also, the twill tape had a hard face and was uncomfortable, and proved very difficult to remove.  I managed to peel it out and slice off most of the remaining hot glue, and have now replaced it with a chamois leather sweatband in just the front half (where most grease tends to accumulate), attached with rubber cement.  It's still a little too snug - I definitely underestimated the hat size during construction - but much more comfortable.  The crown has lightweight interfacing and is lined with part of a worn-out cotton bedsheet.

I tweaked the visor pattern several times.  I found the supplied version (right) too flat and a bit too proportionally long.  At first I thought that widening it would be the best way to get it to curl down more, but in the last few weeks I realized that the major factor is how curved it is on the interior edge:  the less curved, the more the visor is turned down when stitched to the straight edge of the band.  Theoretically, a completely straight interior edge would result in a visor that points straight down.  There actually appear to have been wheel hats made in the 19th century like that, although I don't see the point of such a thing.  This cap uses the pattern second to the left, which is perhaps slightly too narrow and not quite full enough on the outer edge near the corners to optimally shield one's eyes from the Sun.

Friday, October 9, 2020

Biker cap

 
Yesterday I finished one more small leather cap.  This one is basically the same as the one I made in 2019, with some largely aesthetic differences.

The crown and band aren't factory scrap this time, but the remnants of a Mirrabella lambskin I bought some years ago.  Although the one I bought was officially some shade of brown, it looks almost black in most lighting, though it may fade with exposure to sunlight.  I matched it with a black chin cord and artificial sinew stitching and a visor made from the same almost-black oiltan as I used on the last one.  The lambskin is thinner than the unidentified factory scrap, so the cap weighs less.  Also, despite having a wider crown, it crushes down better, giving it a casual look when worn.

Fitting is the only fussy part.  I tried to size the band to be just large enough to fit my oversized head, excessive hair, and a polarfleece sweatband lining.  Unfortunately, this resulted in it being a little too big for the crown, forcing me to pleat as I went and causing unsightly crimping in a few spots.

The band is made of medium-weight two-inch cotton webbing.  The crown is lined with scrap twill, probably cotton.  The buckle is chromed steel.  Though the buttons also look like steel, I later discovered that they won't stick to a magnet, so they're probably pot metal, which raises the possibility that their shanks may break more easily with use.  Otherwise, construction is exactly the same as the last one.